Top 6 Ways to Burn MP4 to DVD on Mac (Working with Detailed Tutorials)
Though DVD burning (e.g. burning MP4 to DVD on Mac) gradually becomes outdated, it’s still a necessary and popular function for certain people because of its:
- High and stable quality (a good way to preserve favorite video clips forever)
- Big storage capacity (you won't worry about computer crashes or disk damage)
- No need for Internet connection
- Ease of display at a party
- Being a perfect holiday or birthday gift
If you just need to save some space on your Mac, you can put the MP4 video into a folder > right-click it > and choose the option to burn your folder to a DVD. However, the built-in "Burn to Disc" feature will result in a data disc (no standard-confirm video-DVD), which will play on Mac but not in a DVD or Blu-Ray player.
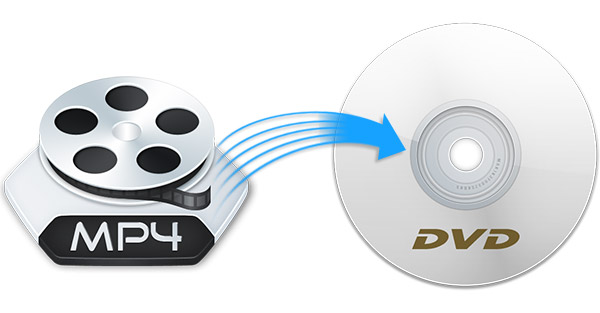
Differences between Data DVD and Video DVD
A Data DVD is like a hard drive that stores digital data, such as document files, videos, and photos from your vacation. It’s a good option for saving space on computers but it’s readable only on Apple computers with a DVD burner.
A Video DVD is a disc full of videos that can be read by a DVD drive and be displayed on TVs. It has menus, chapters and a specific data structure that can be identified by the DVD player.
So, these two types of DVDs are for different future needs. If you just want to store your data and play them on your computer, a data DVD is what you need. If you want to play the discs on a DVD player or a computer with a DVD drive, you have to burn the MP4 videos to video DVD.
Brief Summary:
To burn MP4 to playable DVD Mac, you should convert MP4 to DVD format Mac by re-encoding the video in MPEG-2 at first and then burn DVDs with a designed software like iMovie, iFunia or other similar applications.
 iFunia DVD Creator
Best MP4 to DVD Burner Mac
- Transfers MP4 to DVD format. Not only MP4, but also MOV, M4V, MKV, AVI, M2TS, TS, etc. Besides, you can put videos in different formats into one DVD.
- Built-in editor. Options to customize the backgrounds, buttons, text, and more.
- Rich menu templates. Provides DVD menu templates of various types and themes.
- Preserves the quality. High quality with the subtitles and audio tracks, even for large files.
- Allows preview. Before burning, you can preview to complete the editing.
- Easy to use. With the straightforward interface, even a beginner can burn DVDs without problems.
- Fast Speed. Its quick encoding and burning speed will help you save more time.
 Free Download macOS 10.12 or later
 Free Download Windows 11/10/8/7
 A number of DVD burners, like iDVD, don’t work now for various reasons. Hence, I tested the most popular ones on Mac. Luckily, this is not the end of converting MP4 to DVD format Mac, as we can still find a few powerful and practical DVD creators.
Below, I will show you how to burn MP4 to DVD on Mac along with some useful programs along with the pros and cons of each.
[Best one] Burn MP4 to DVD with iFunia DVD Creator for Mac (Sequoia, Sonoma, Ventura, Monterey, Sierra, etc.)
I have taken a look at a wide range of different MP4 to DVD burners for Mac, along with those preinstalled in your devices already. Some of them are remarkable in their simplicity, others stand out with a huge feature set.
When hunting for the best software to burn MP4 to DVD Mac, it's important to find one that’s reliable, able to retain the quality of the original video and has rich functions. To offer an all-in-one solution, iFunia DVD Creator is out of the ordinary.
Over the years, more and more software has been discontinued or outdated as the less demand for creating DVDs, but iFunia DVD Creator always works and is updated regularly. Let’s take a look at the complete features of this powerful and useful DVD authoring software.
Pros:
- Easy to use without a learning curve
- Super-fast DVD-burning speed
- Burn any video formats to a DVD disc, DVD folder, or ISO file
- Smooth processing without losing quality
- Edit and personalize videos by trimming, cropping, adding watermarks, subtitles...
- A variety of DVD menu templates with different themes
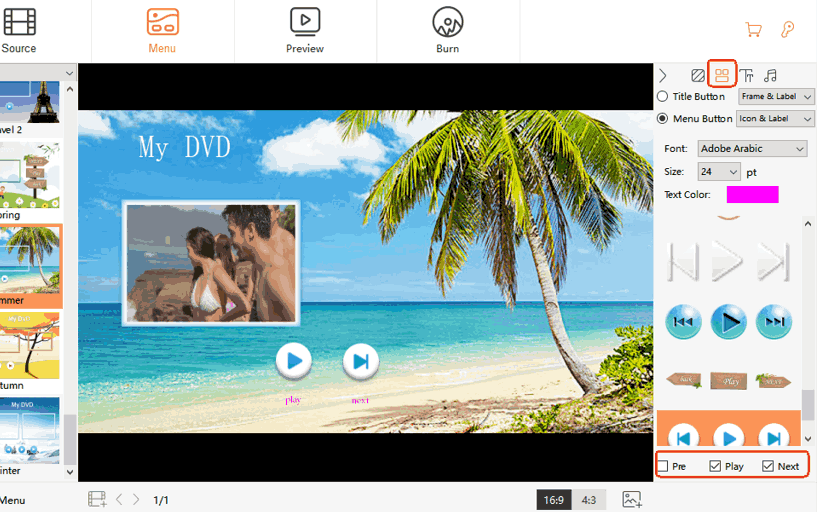
- Allow you to customize by changing background images, music, title/menu buttons, text font/size/color, etc.
- Offer a built-in media player to preview videos in real time
- Offer 5 different playback modes
-
Highly compatible with macOS and Windows
Cons:
- Not totally free. (offers a free trial before purchasing)
How to Burn MP4 to DVD on A Mac with the Best DVD Burner:
Step 1. Install the software on Mac
Download iFunia DVD Creator and install it.
 Free Download macOS 10.12 or later
 Free Download Windows 11/10/8/7
Insert a blank and writable DVD into the DVD drive. (If your Mac doesn't have a DVD drive, connect a USB DVD drive to the Mac)
Step 2. Load multiple MP4 files
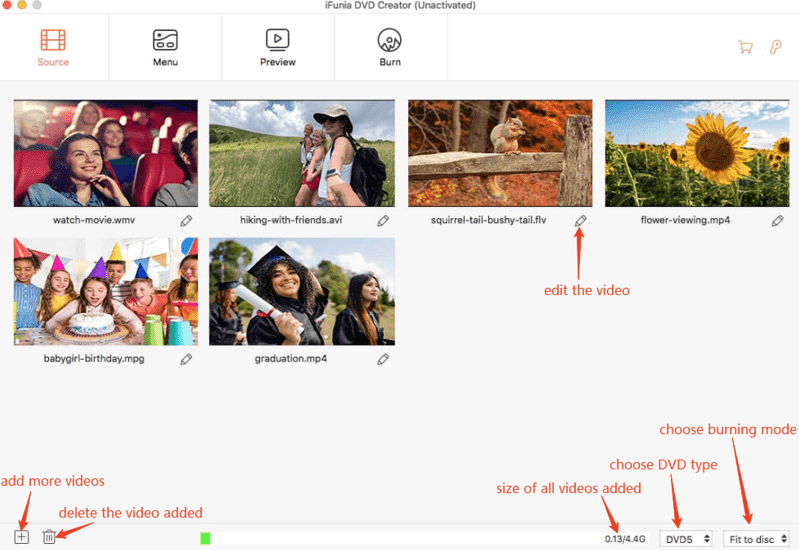
Launch the software, and stay at the default “Source” interface to add videos for burning.
Drag and drop your MP4 files into it. This MP4 to DVD creator supports burning video files in batch, so you can add as many video files as you need.
DVD5: A single-layer DVD holds 4.7 GB of data.
DVD9: A dual-layer DVD holds 8.5 GB of data.
Step 3. Edit the MP4 videos
Click the ![]() icon, and go to edit your MP4 videos.
icon, and go to edit your MP4 videos.
Trim: cut the video length according to your needs.
Thumbnail: under the video, the camera icon is for capturing the video thumbnail.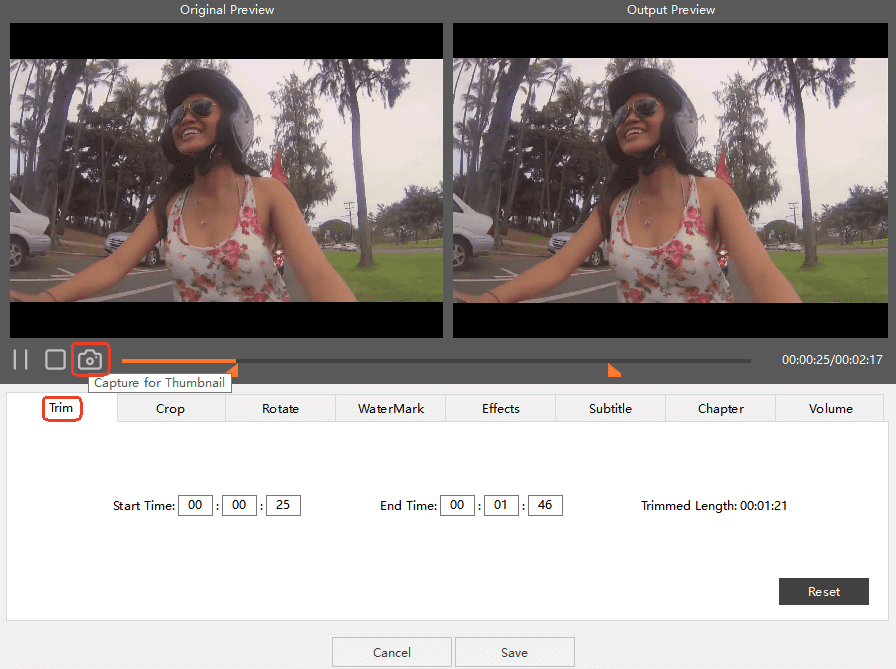
Crop: crop the video to fit your TV frame or to remove unwanted content like black bars.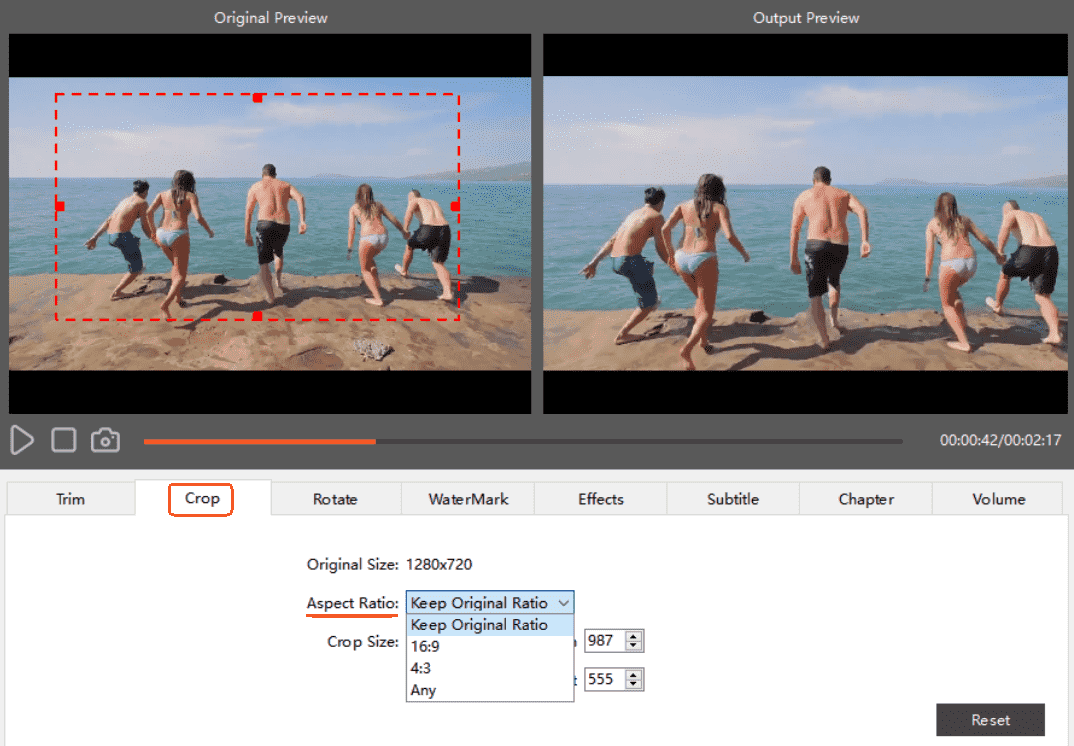
Effects: in this part, you can adjust the brightness, temperature and saturation of the pictures. It enables to lighten dark images and even deinterlaing (converting interlaced video into a progressive and clearer video format.)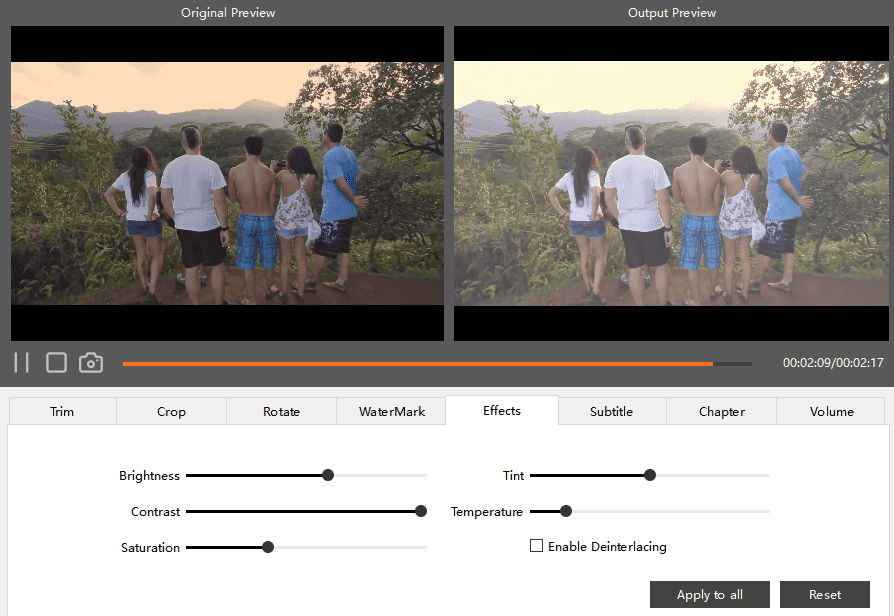
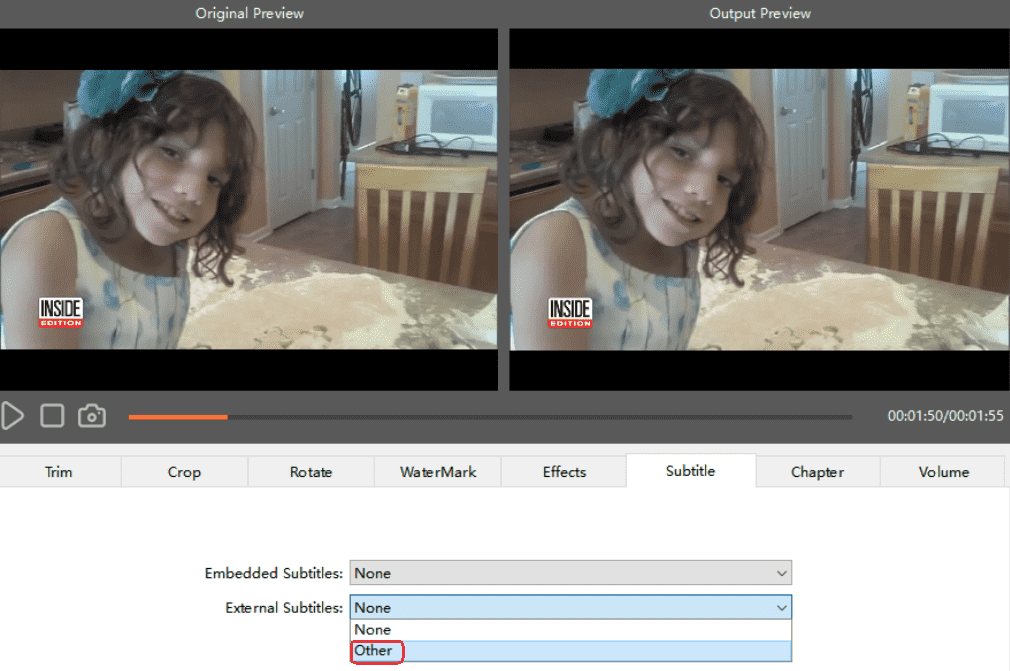
Subtitle: you can add the subtitle under this tab, if there are no captions embedded in the video, you can also add external subtitles.
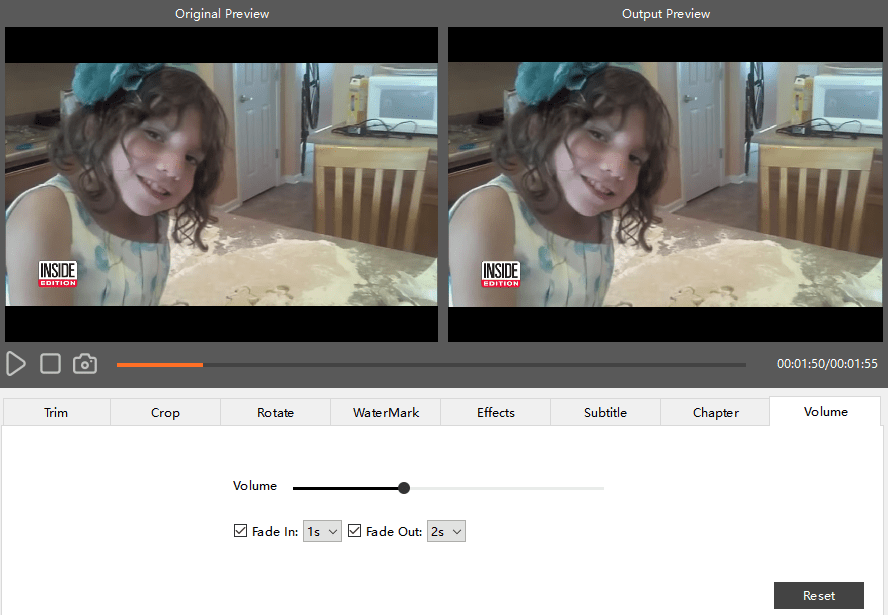
Volume: fade in means the audio gradually increases from silence at the beginning, fade out gradually decreases to silence at the end.
Step 4. Choose a menu if necessary
Move to the "Menu" tab on the top to switch to another interface for creating DVD menus. Choose a menu template that is suitable for your DVD subject, and you can also create a special DVD menu as you need. For sure, you can click "No Menu" as well.
Let’s switch over to check other functions, you’ll find that it empowers us to customize the title and menu buttons with text under them.
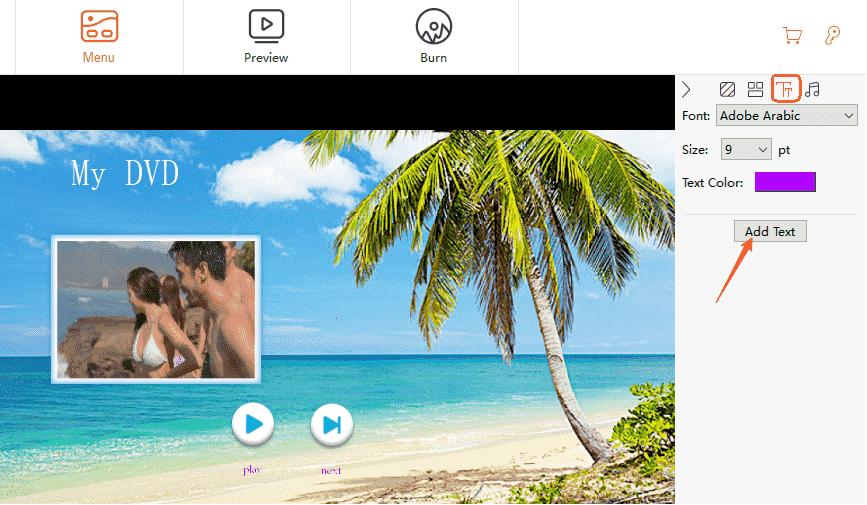
If you want to add some explanations and feelings to the video, adding text to the page is a good option.
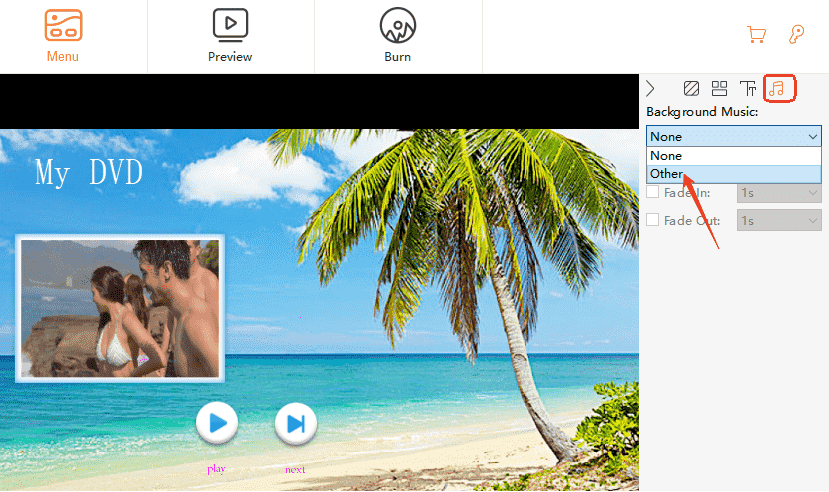
Besides, adding background music is possible.
Step 5. Preview your project
Click the "Preview" tab to check if the content meets your needs. Otherwise, you can go back to adjust the unsatisfactory settings.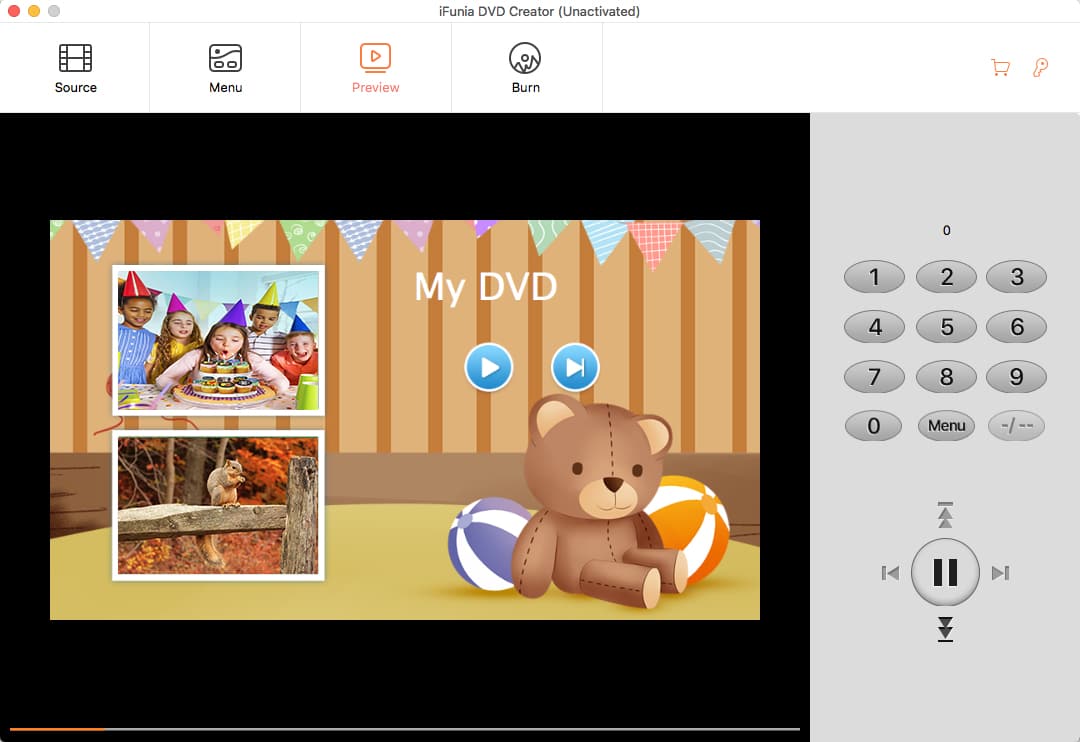
Step 6. Convert MP4 to DVD Mac
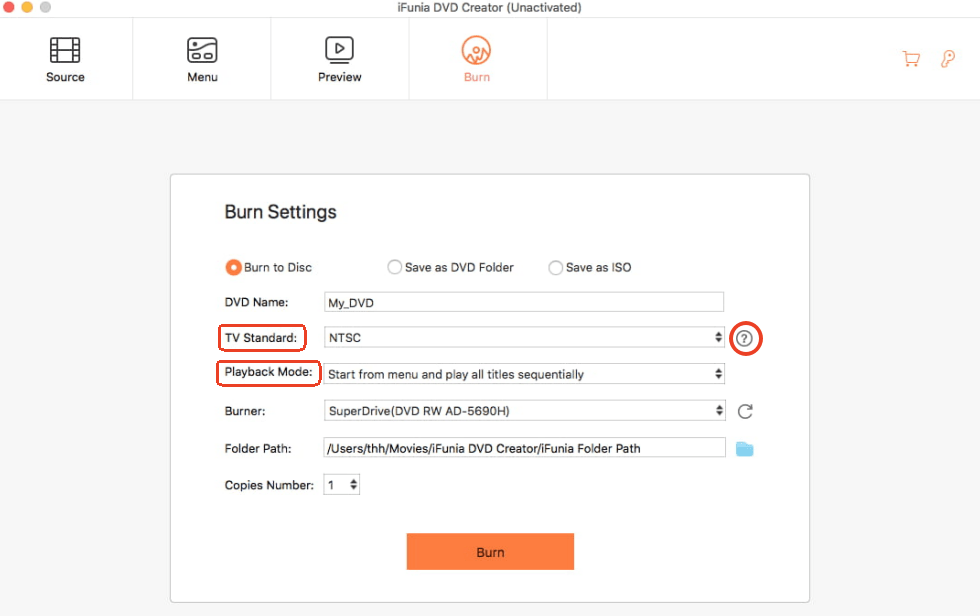
Click the "Burn" tab > select the output format from DVD Disc, DVD Folder, and ISO File > adjust the DVD settings > select the burner and the folder path.
TV Standard: NTSC if you are in America and PAL in Europe. If you don’t know which one to choose, just click the question mark to select your region and it will automatically choose for you.
Playback Mode: choose according to your habit between the 5 modes.
Click the "Burn" button to start the MP4 to DVD burning process. The amount of time depends on the computer hardware and the size of the MP4 videos.
Once it’s finished, you will get the special DVD, which you can use for gift sending or playing on your home DVD player.
Read More: How to Burn MP4 to DVD on Windows 10/11
5 Alternative Methods to Burn MP4 to DVD on Mac
Method 1. Burn
Burn software for Mac can burn videos, songs as well as data to DVD. While coming with limited features and a rather simple user interface, the app is easy to use with decent performance. You can use the free app Burn to convert MP4 to DVD on Mac or recreate previously created DVDs.
Pros:
-
Free
-
Lightweight with a small file size
-
Delightfully straightforward user interface
Cons:
-
Not very customizable with limited file formats and features
-
Crash occasionally
How to Burn MP4 File to DVD on Mac:
1. Get the software from burn-osx.sourceforge.io, and open the software.
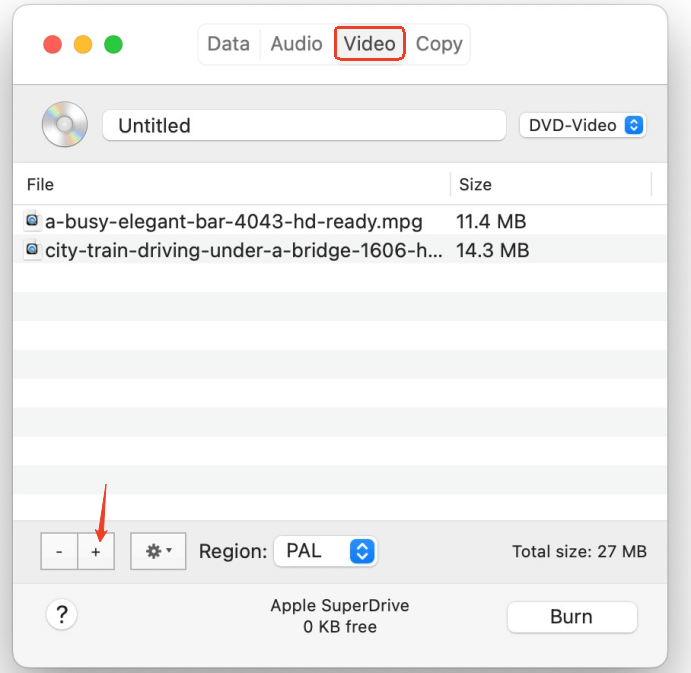
2. Choose the "Video" tab.
3. Drag your MP4 video file to the main interface. Or click the "+" button in the bottom left corner to navigate the file.
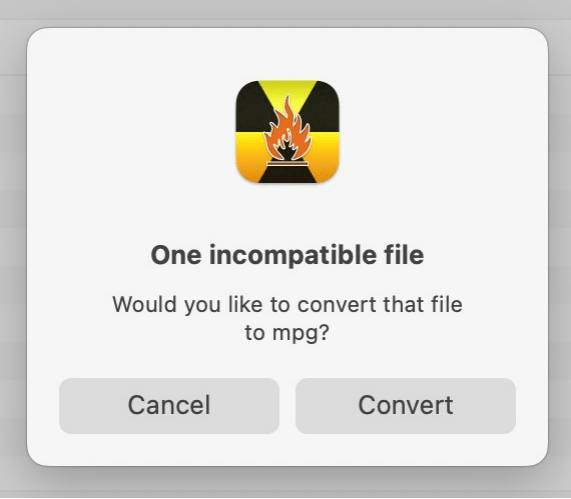
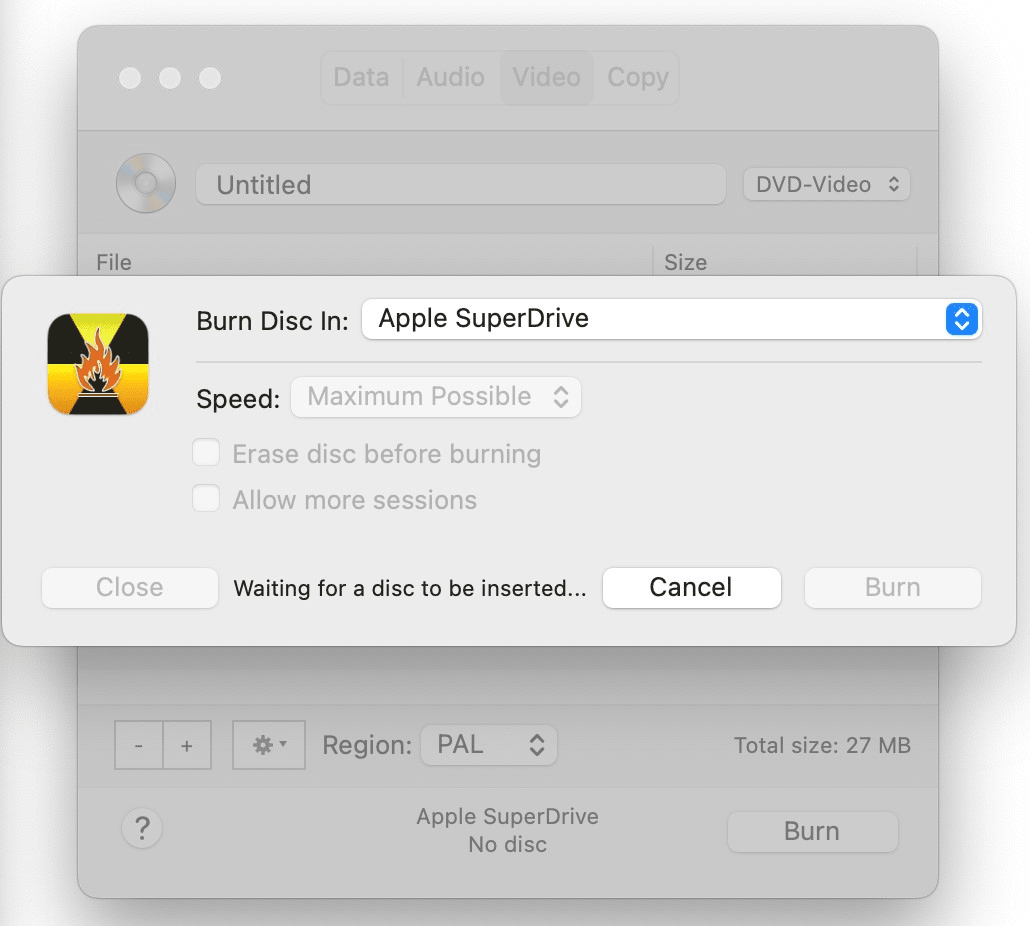
4. It may pop out a window like this, hit on Convert to convert MP4 to DVD Mac free.
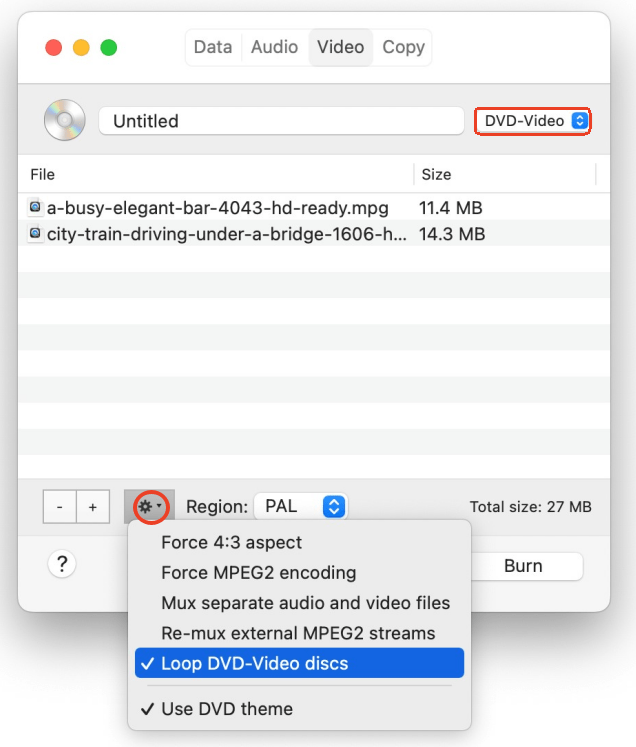
5. Choose the output as "DVD-Video". Below, press on the gear icon, or choose Preferences from the Burn tab on the upper menu to define other settings.
6. Plug in a DVD and start to burn MP4 to DVD on Mac right now.
Method 2. DVDStyler
DVDStyler is an open-source DVD authoring software available on Mac, Windows and Linux. It’s simple to use with a user-friendly and sleek interface.
Pros:
-
Free
-
It allows menu creation, buttons, and DVD previews
-
Supports AVI, MOV, MP4, MPEG, and other formats
Cons:
- It crashes and fails occasionally.
How to Burn MP4 to DVD Mac:
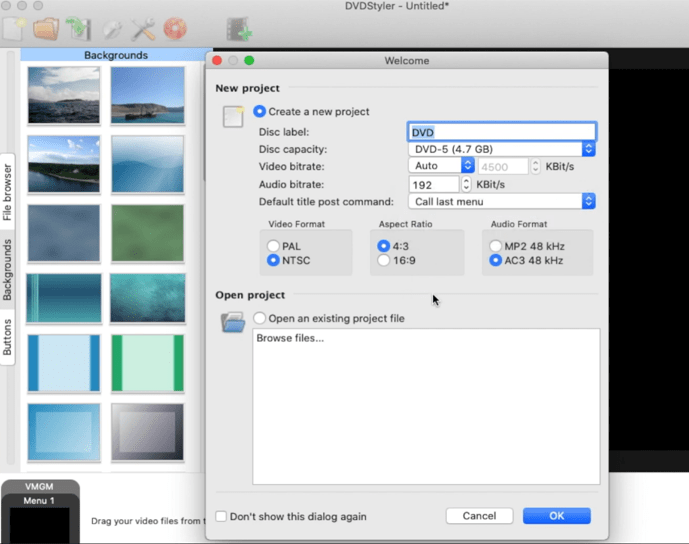
- Open the app. It will show you a Welcome window to choose your preferences.
![convert mp4 to dvd mac free]()
- Before starting, click from the upper menu File → Save as... to save the project as the software may crash or fail if you add some large files, and don’t forget to click Save periodically.
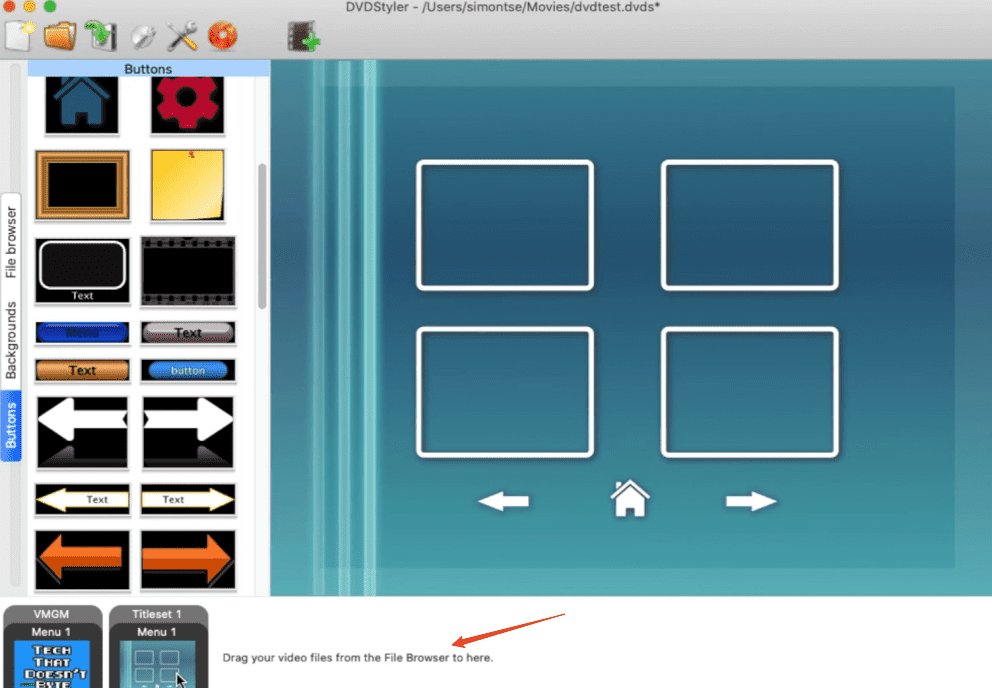
- Drag your video in the below area.
![convert mp4 to dvd mac free dvdstyler]()
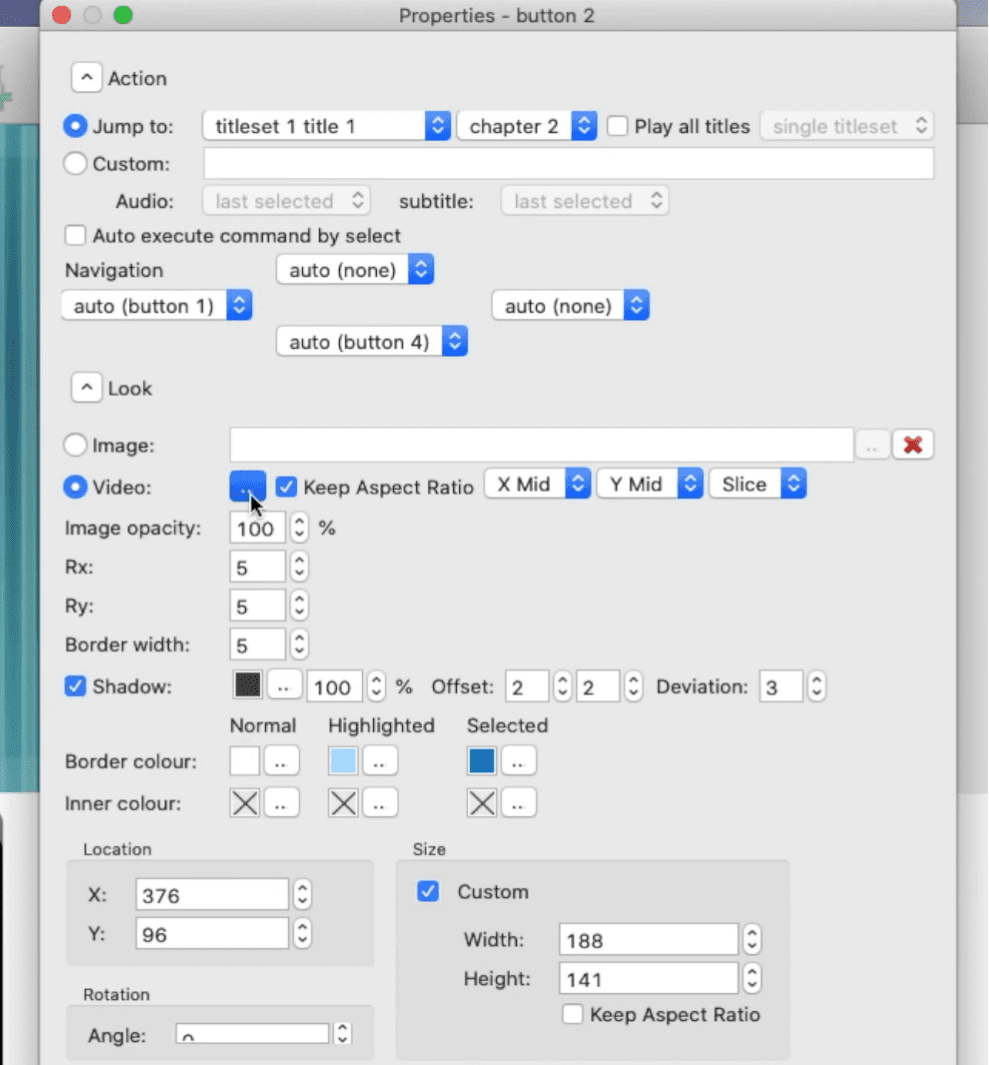
- If you want to edit the video, right-click on it and choose Properties.
![convert mp4 to dvd mac free]()
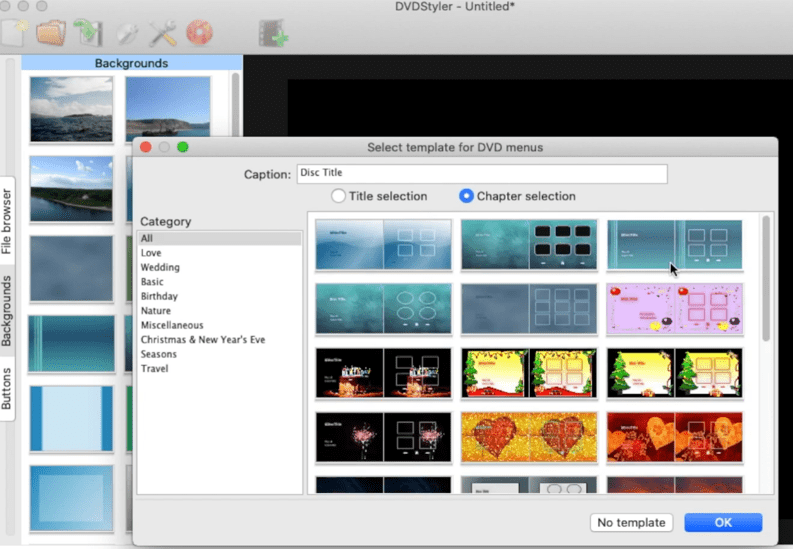
- Select a menu template from the left panel.
![convert mp4 to dvd mac freeware]()
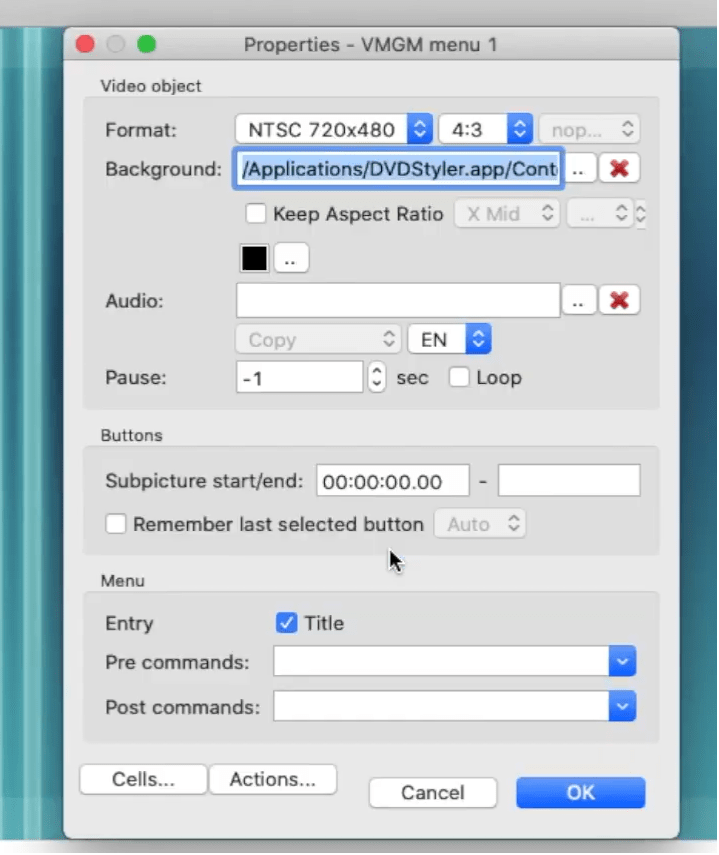
- If you aren’t satisfied with the menu, righ-click on the page and choose Properties.
In the right-side toolbar, you can choose buttons and backgrounds as well.![convert mp4 to dvd mac free1]()
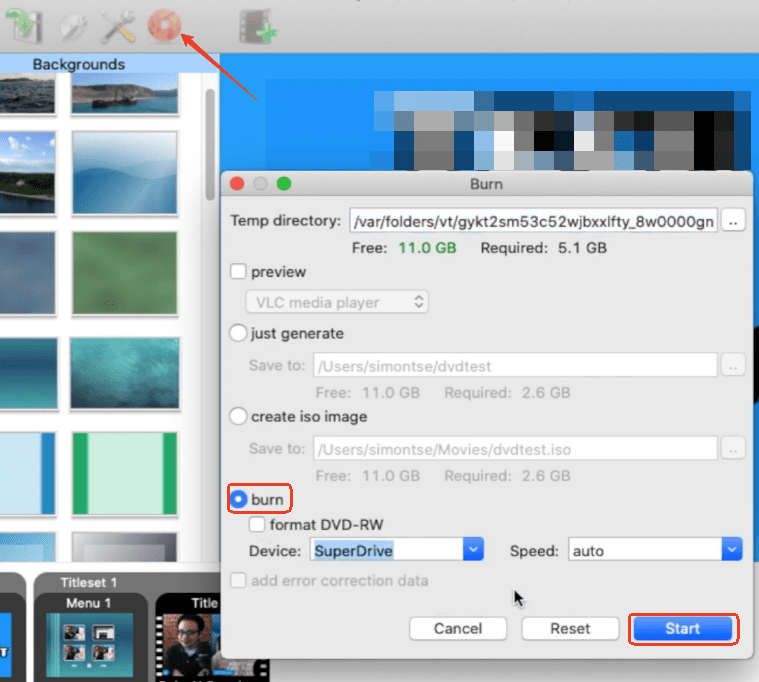
- At last, click the red Burn button to start the burning. Plus, you can preview it before burning.
![convert mp4 to dvd mac free2]()
Method 3. Express Burn
Express Burn supports burning files to CD, DVD, Blu-ray on Mac and Windows. It contains a series of menu templates and buttons for DVD authoring.
Pros:
-
The Pro version is good at burning CD and Blu-ray discs that other general MP4 to DVD burners are not able to do
-
Full of settings to personalize
-
Fully compatible with both Mac and Windows
Cons:
-
Not free, the free version can only burn CDs
-
Unable to burn commercial DVDs
How to Burn MP4 Files to DVD Mac:
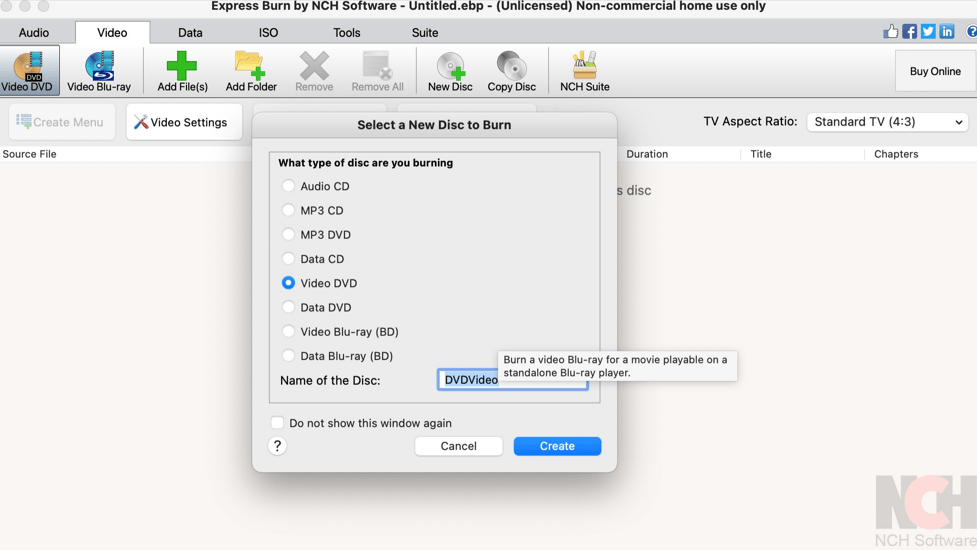
- Run the software, and it will pop up the screen for you to choose a disc type, just choose "Video DVD".
![how to burn mp4 to dvd mac]()
- Add your MP4 video to the program. You can set the aspect ratio according to your playing device.
![how to burn mp4 to dvd mac free]()
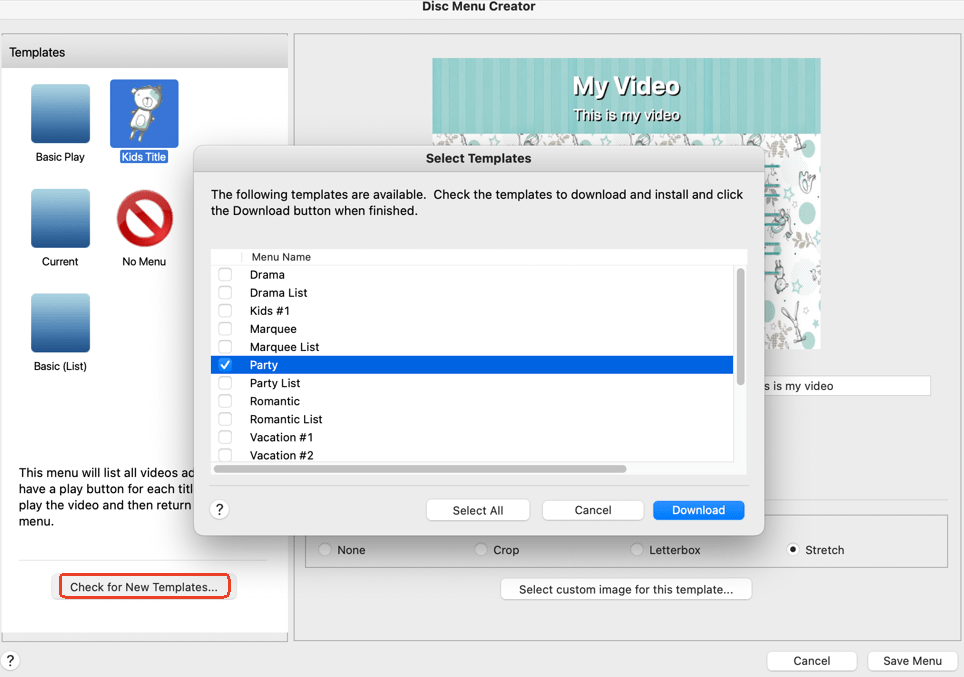
- You may notice that there are plenty of setting options. Choose Edit Menu to add a menu.
![convert mp4 to dvd format mac express burn]()
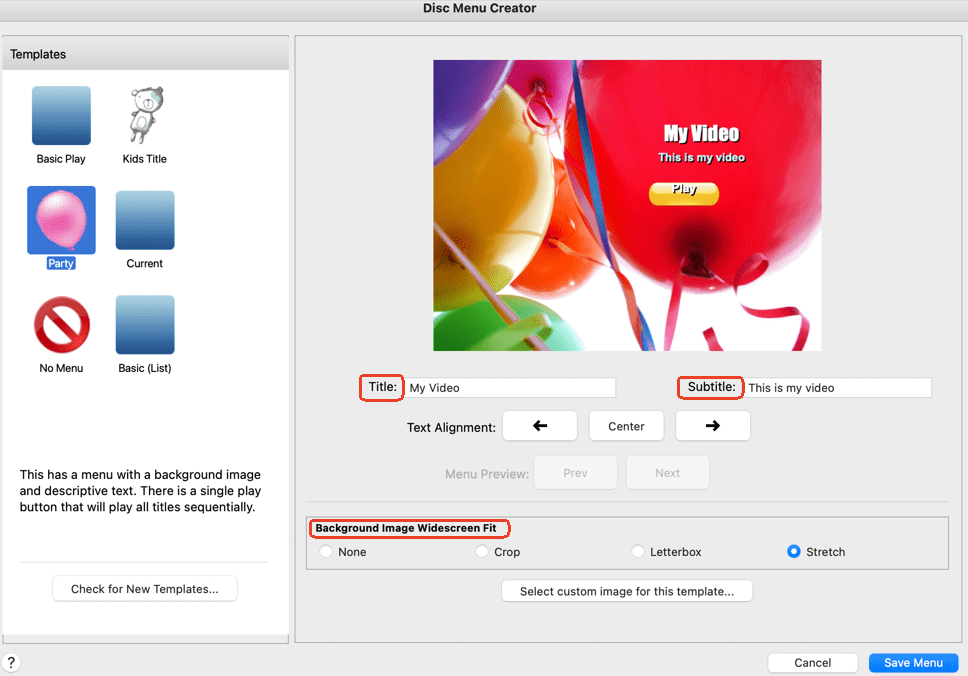
- Here you can adjust the background image widescreen fit and other customized settings like the title, subtitles.
![convert mp4 to dvd format mac free express burn]()
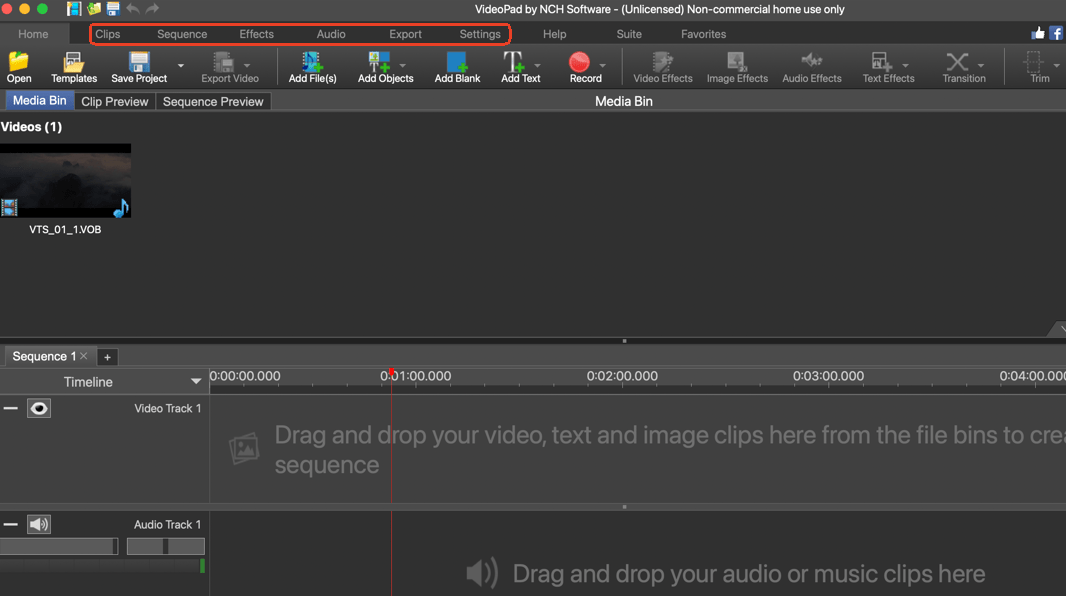
- There’s also a VideoPad program that you can install to edit the videos.
![burn mp4 to dvd format mac express burn]()
- Make sure you have your blank DVD-R or DVD-RW inserted. Then, start the burning process.
Method 4. Roxio Toast Titanium
If you want to burn family videos, holiday videos, wedding videos, etc. to home DVDs, Toast is a good choice. Just like some apps listed above, in addition to videos in MP4 or other formats, it can also burn photos and data to DVD. One great feature is that it supports burning HD DVDs with fancy DVD menus which brings a good burning experience.
Pros:
-
Allows to burn, copy, convert, capture, edit and create encrypted disks
-
Versatile with powerful performance, allowing users to burn MP4 to DVD Mac like a pro
-
Supports burning HD DVDs
-
Various customization options
Cons:
-
Paid with high price
-
No free trial before purchasing
-
New users may feel overwhelmed by some features
How to Burn MP4 to DVD Mac:
- Install and launch Toast Titanium.
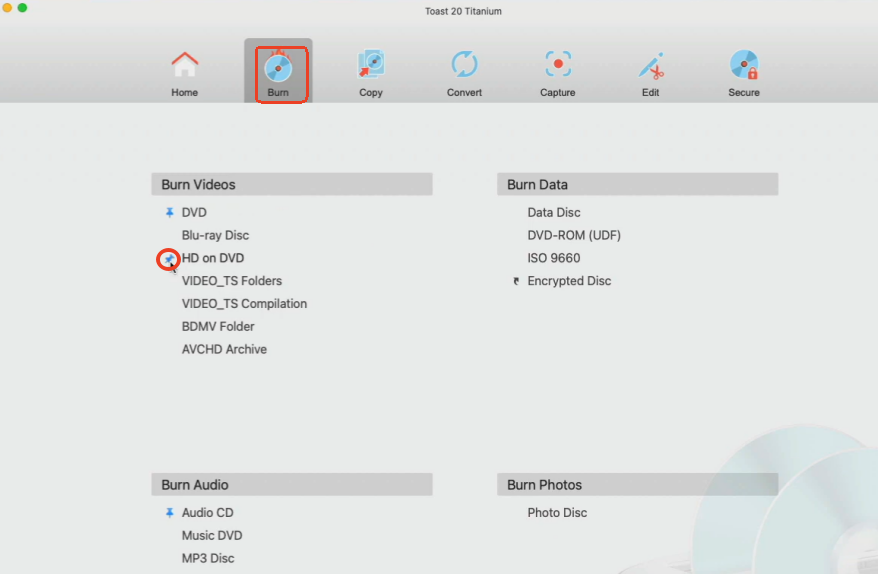
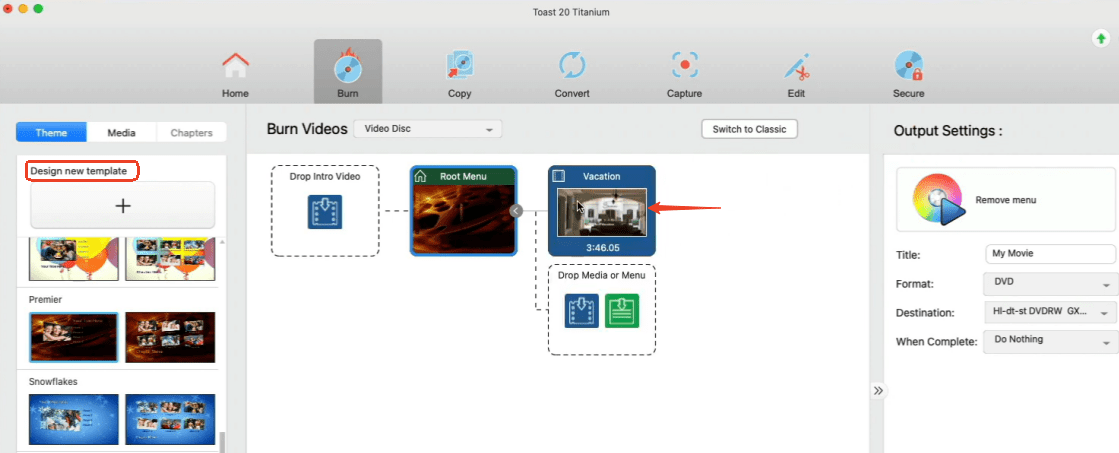
- Move to the Burn tab and choose from Burn Videos. You can pin the type of DVD you’ll frequently use on the home screen.
![how to burn mp4 to dvd mac Roxio Toast Titanium]()
- Drag the video you would like to burn into the specified area. Be careful about the sequence you import, it will be in that order later in the DVD.
On the left panel, under the Theme tab, there are 20 templates that you can choose or you can design your own template.
On the right panel, define the output settings.![how to burn mp4 to dvd mac Toast Titanium]()
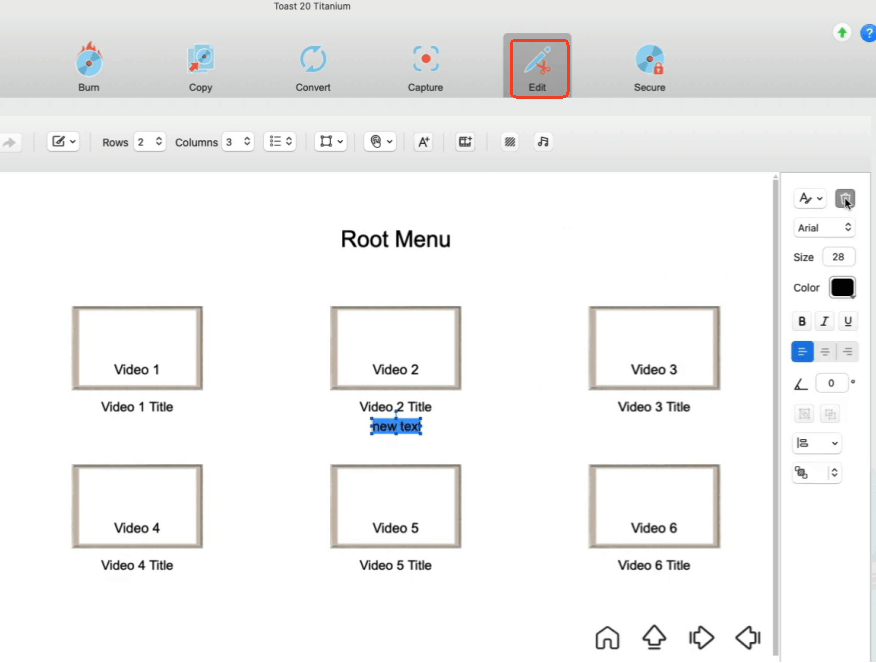
- Switch to the Edit part, you can customize various preferences like adding text, the menu style, adding background music, etc.
![how to burn mp4 to dvd mac Toast]()
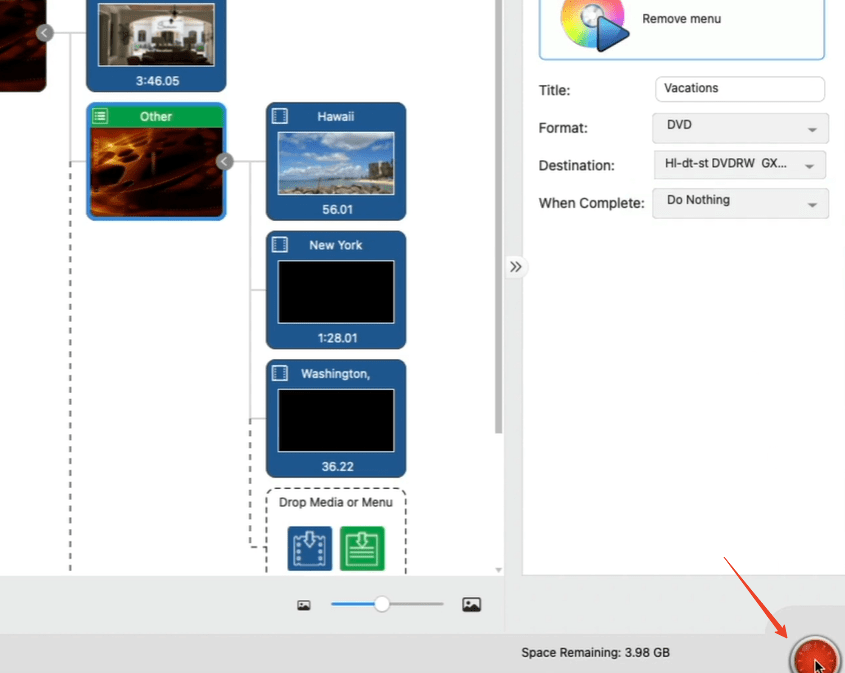
- When everything is prepared, grab a blank disk and hit on the burn button.
![how to burn mp4 to dvd mac Roxio Toast]()
Method 5. iDVD (for old Macs before Mac Lion 10.7)
iDVD is a DVD authoring software developed by Apple to create DVDs with menus. You can use it to burn movies, videos, music as well as photos to DVD. It only takes a few steps.
However, it was discontinued by Mac since Mac Lion back in 2011. So, if you are still using an old macOS 10.6 or earlier, iDVD is the one, if you cannot reach iDVD, use other software mentioned, or purchase a copy of iLife '09 from a retailer like Amazon.
Pros:
-
Free
-
Easy to use with helpful instructions
-
Burn MP4 to DVD Mac with decent quality
-
Come with various DVD themes that can be customized
Cons:
- Discontinued since 2011, not accessible for Mac Lion and later versions.
How Do I Burn MP4 to DVD on Mac using iDVD:
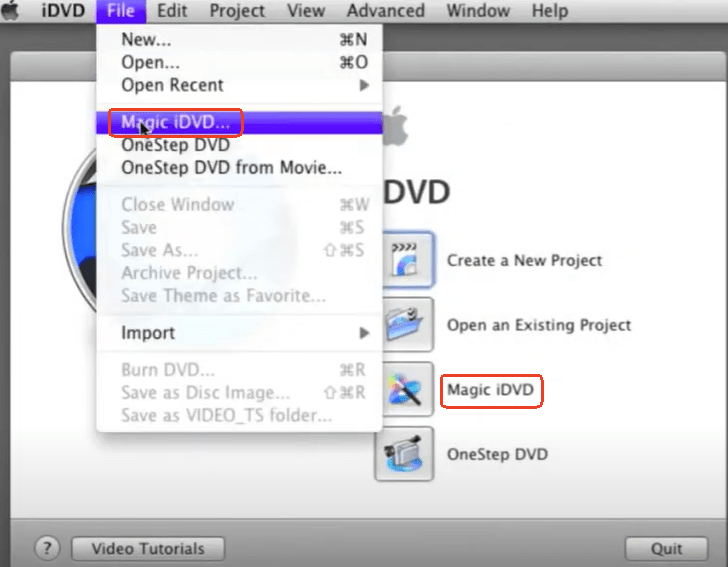
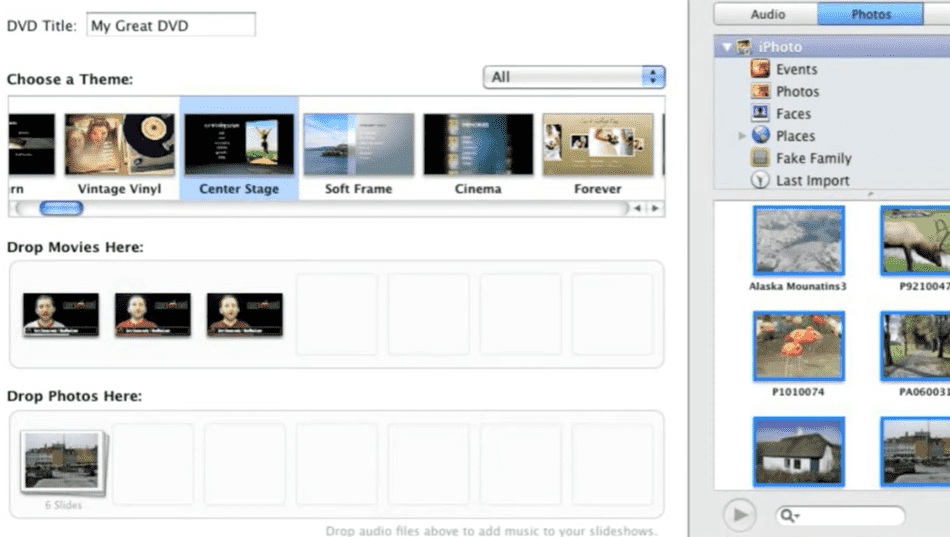
- Launch the app iDVD. Choose Magic iDVD.
![how to burn mp4 to dvd mac idvd]()
- Select a menu theme, which you can customize by adding music and pictures.
- Drag and drop the MP4 video that you want to burn into the app. Of course, you shouldn't forget the essential part of inserting a blank DVD into your computer.
![how to burn mp4 to dvd mac idvd free]()
-
Simply click the Burn button to convert MP4 to DVD on Mac for free, and just wait for the process to finish.
FAQ
Copy a DVD VS Burn a DVD, What's the Difference?
As the name implies, "copy DVD" means copying the contents of a DVD. You should use a third-party tool to remove the copying protections (CSS, UOP, RC, APS, Cinavia) and make a copy of the DVD on a brand-new disc. But you can’t distribute copyrighted DVDs or use them for business purposes.
"Burn DVD", a colloquial term, refers to the process of writing content for a video DVD or a data DVD. To make a DVD video playable on a DVD player, we have to burn it.
How to Burn MP4 to DVD Mac iMovie?
Developed by Apple Inc., iMovie is a free video editing software app available for Mac and iOS devices. You can use iMovie to export videos in MP4 or any other supported format to DVD. However, on Mac where iDVD is no longer offered, users have to choose iTunes or other applications to accomplish the task.
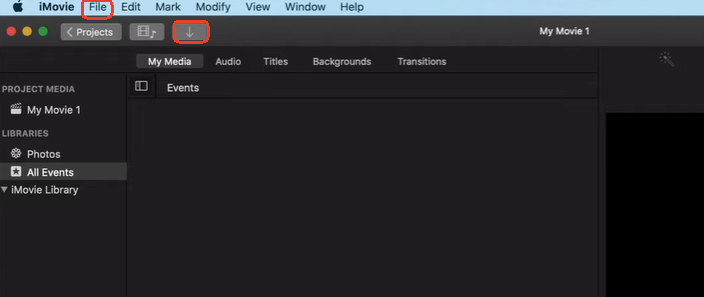
- Import your MP4 videos to iMovie by selecting Import from the File tab or clicking the arrow-down icon.
![how to burn mp4 to dvd mac imovie]()
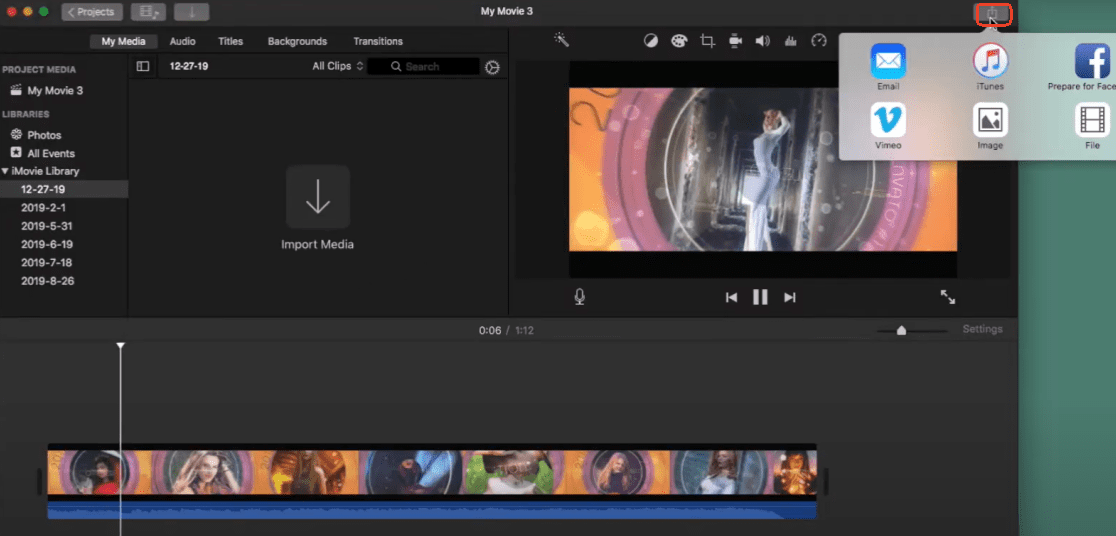
- Click the share button, if you still have iDVD on an old Mac, choose iDVD to burn the videos. Or, select iTunes to follow the instructions and burn MP4 to DVD Mac.
![burn mp4 to dvd mac imovie]()
Final Words
Above are the methods to convert MP4 to DVD Mac free by using different software tools. Which one do you think is the best to use? If you haven't decided yet, feel free to try them one by one with the free trial.
If you have frequent DVD burning demands, a powerful professional DVD burner full of customized features and settings like iFunia DVD Creator is highly recommended.

Chloe LEE is good at explaining and solving complex technology problems to her readers. Since joining iFunia Studio, she has focused on writing articles about video and DVD software, and how-to tutorials.



J Snow
The first one worked perfectly on my MacBook Air to create a personalized DVD without iDVD. I burned a video DVD and sent it to my relative as a birthday gift.
www.waste-ndc.pro
Pretty nice post. I just stumbled upon your blog and wished to say that I have truly loved surfing around your blog posts.