Burn Playable DVD – Step-by-Step VLC Tutorial
"Can VLC burn DVDs?"
"How to burn DVD with VLC, do I need to know code to do it?"
As one of the most popular media players under the sun, VLC has tons of hidden features. We use it to play videos, convert video, edit video and we also want to use VLC to burn videos to DVD and play it on DVD player or TV.
Yes, We can use VLC to burn DVDs. In this article, we’ll show you how to burn DVD with VLC, step by step. We also list some points to note and give tips on troubles you may meet. Please refer to this article if you are trying to burn DVD on Mac or Windows with VLC media player.
Also, as a bonus, we’ll show you an easier way to burn playable dvd with menu, chapter and subtitles.
Ready? Let’s dive in.
Why You'll Love This Tip:
- You can burn videos to a playable DVD with VLC.
- The app is free and works with Windows, Mac, and Linux.
- Create a fully personalized DVD with menu and subtitle that perfectly suits your aesthetic taste and style.
 iFunia DVD Creator
Burn DVD With Menu, Chapter, Subtitle in 3 Steps
- Support 300+ video formats including MOV/WMV/MP4/AVI/FLV/MKV and others.
- Best alternative to VLC for burning videos to DVD/ISO/DVD folder.
- Offer ready-made DVD menu templates for different occasions.
- Customize DVD menu title, background, thumbnails, etc.
- Built-in editor to personalize videos by trimming, cropping, adding watermark/subtitle, applying effects, etc.
- Set the TV standard as PAL or NTSC.
- Change display ratio to 4:3 standard TV or 16:9 widescreen.
- Burn videos to DVD with high output quality and speed.
- Convert videos to DVD discs playable on a DVD player or TV.
- Supports multiple DVD disc formats like DVD-5, DVD-9, DVD+R/RW, DVD-R/RW, DVD+R DL, DVD-R DL.
- Burns multiple copies of DVDs with GPU hardware acceleration for fast speed.
 Free Download Windows 10 or later
  Free Download macOS 10.12 or later
Part 1. The Fact of VLC DVD Burning Feature
Can VLC Burn DVD?
VLC makes it clear in its wiki (https://wiki.videolan.org/VLC_HowTo/Make_a_DVD/)- It can burn videos in MPEG2 to DVD, but it doesn't work for other video formats.
MPEG2 is a file compression standard for DVD video and audio. It can be formatted as either PAL or NTSC based on the country you currently live in. Use the right format and standard will make sure the DVD you burned with VLC are playable on your home TV or DVD player.
- PAL is the standard in Europe, Australia, and some countries in Africa, South America, and Asia.
- NTSC is the standard in the United States, Canada, Japan, and some other countries.
Pros:
- Free and open source software.
- No need to install other programs.
- Burn MPEG2 to playable DVD.
Cons:
- Only burn MPEG2 to DVD, other video format not supported.
- Burning features are not very easy to use in VLC.
- You cannot preview the video before burning.
- No menu or other customize functions.
Most professional DVD burning software supports burning DVD with different formats and you can set to burn as NTSC or PAL before burning them to disc.
Part 2. How to Burn DVD with VLC: Steps
As an open-source media player, VLC won't cost you a penny. The latest version is 3.0.21 for Mac (Mac OS X 10.7.5 or later), Windows (Windows XP SP3 and later) and Linux.
Simply go to its official site - https://www.videolan.org/ to download and install it on your PC.
- Insert a disc into the disc drive and launch VLC.
- Add your MPEG2 video to VLC.
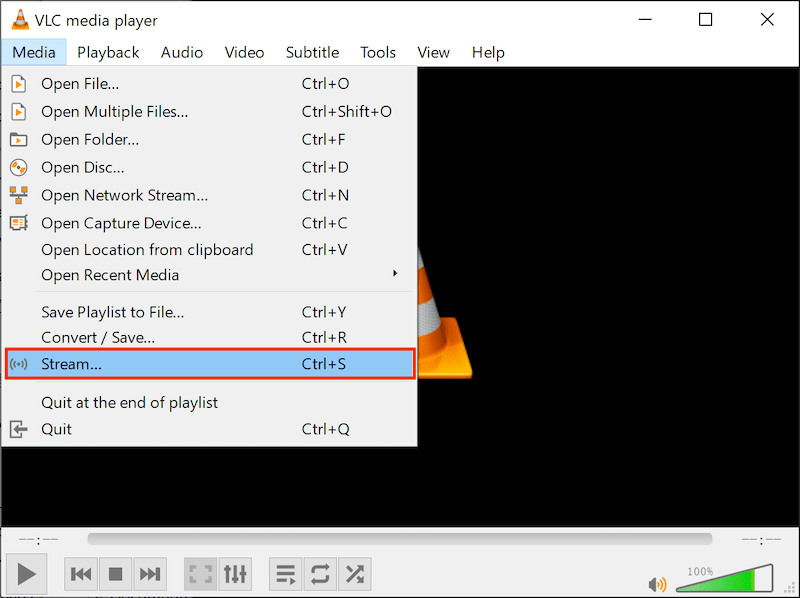
- Open VLC, Go Media >> Stream.
![]()
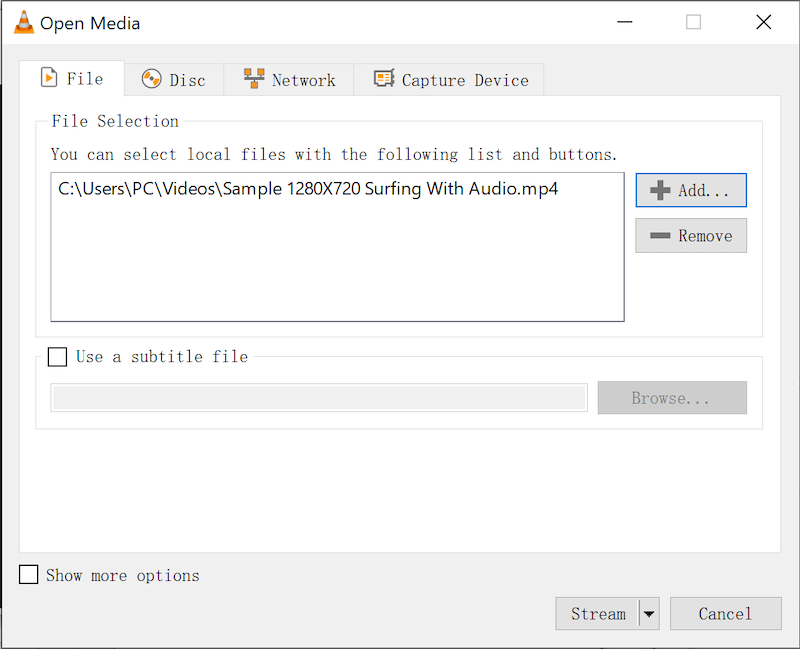
- Then click Add to load the file you want to burn DVD. And click Stream to proceed.
![]()
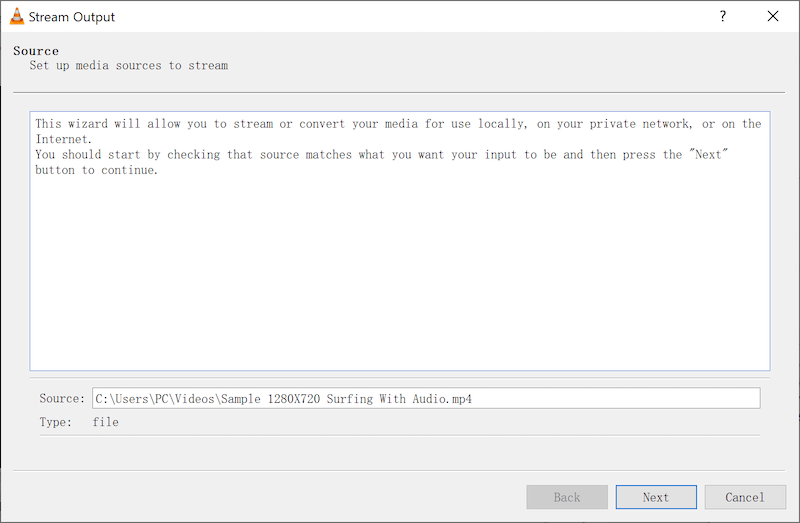
- Click Next to proceed.
![]()
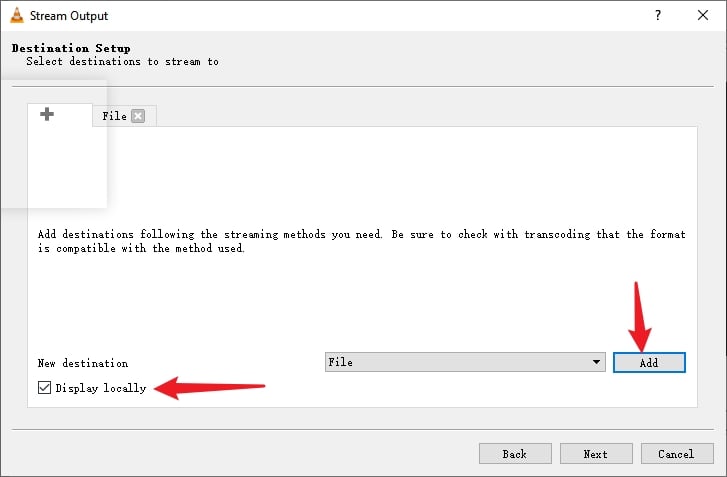
- Then, check the Display locally option and click Add to set your DVD drive as the destination.
![]()
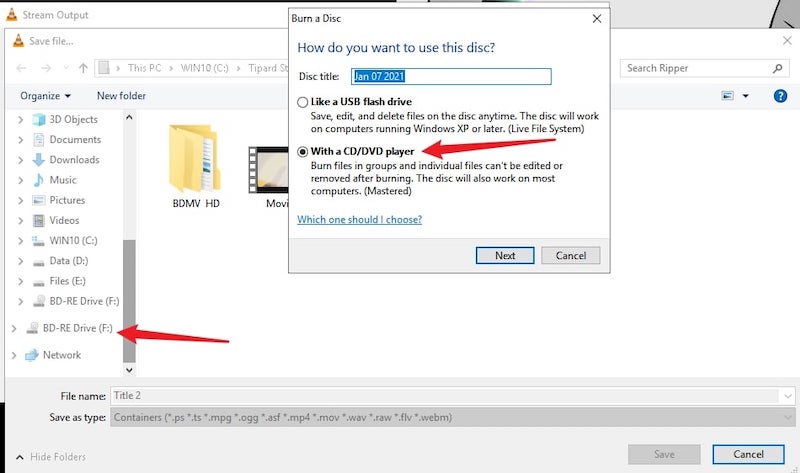
- Then a window will pop up and ask how do you want to use the disc? Here, select the second option - With CD/DVD drive and click Next.
![]()
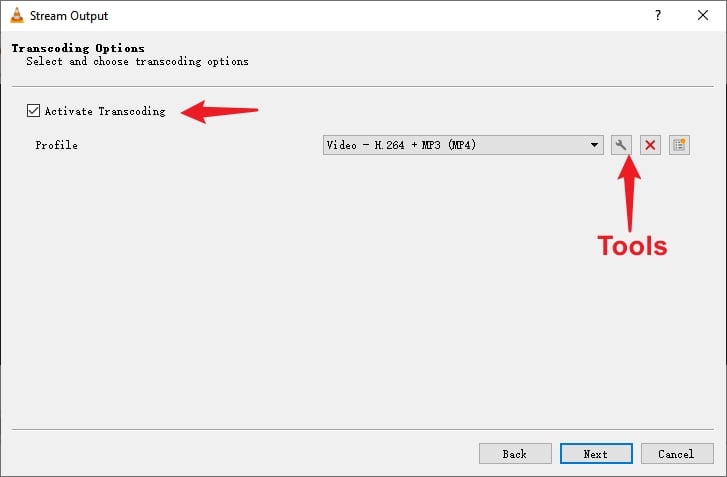
- In the new windows, check Activate Transcoding option and then click the tool like icon.
![]()
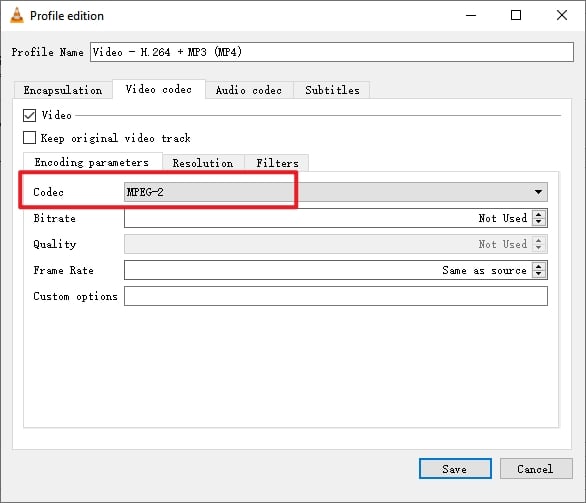
- Go to Video Codec and set the Codec as MPEG-2. Then click Save.
![]()
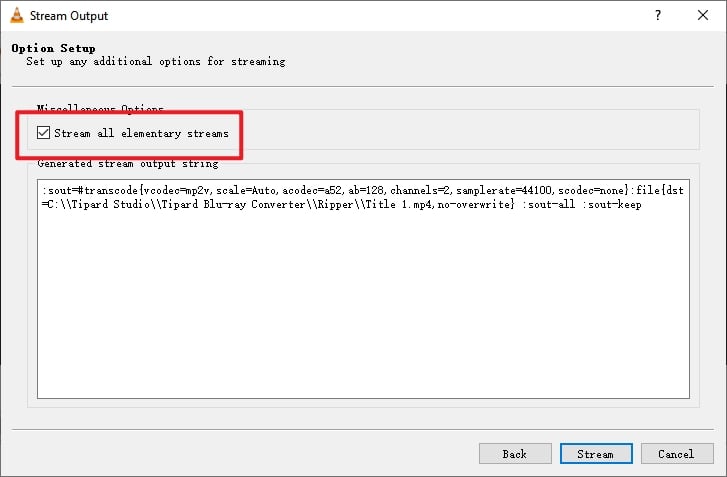
- In the new window check the Stream all elementary streams option, and click Stream.
![]()
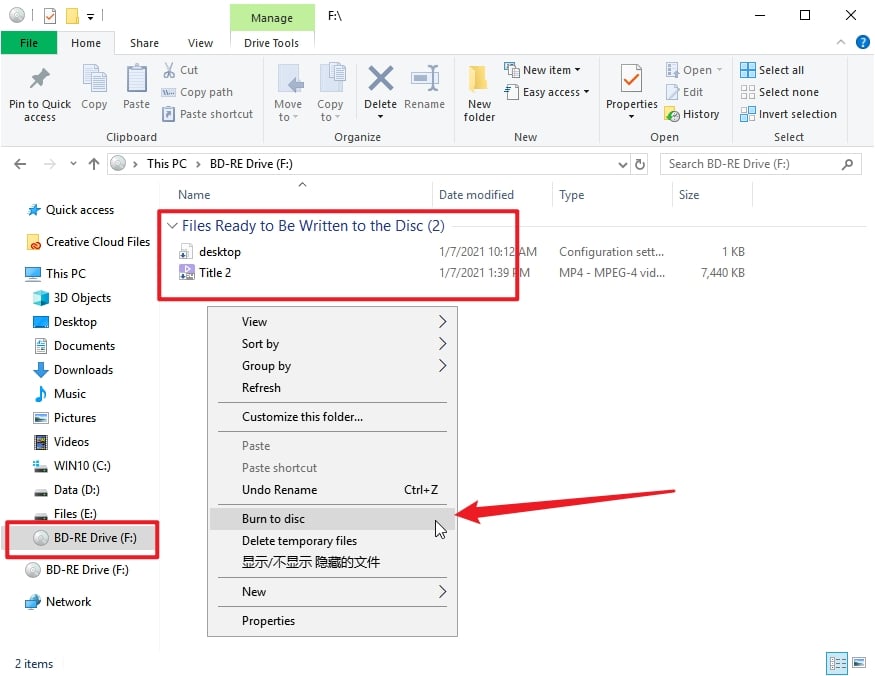
- Open your disk drive folder, you will two files in Files Ready to Be Written to Disc. Right-click on an empty space and choose Burn to disc to start burning DVD with VLC.
![]()
Additional Notes:
- Use a disc that supports burning, such as DVD-R and DVD-RW.
- Choose a disc with appropriate capacity according to the size of your video file, such as DVD-5 Disc for 4.7GB and DVD-9 Disc for 8.5GB.
- To make sure the dvd you create with VLC is compatible with other devices, you need to use a video convert to reformat the video is it is in a format other than MPEG2.
Part 3. Troubleshooting Burning DVD with VLC
The finish of the DVD burning is not the end of the story. As a media player, VLC was not originally intended for Burning DVDs. That is why it takes many steps to burn a DVD. And sometimes it doesn't work well, there are many complaints as follows:
"It DOES work, except that it is rather slow."
- Why this happens
VLC takes full advantages of hardware decoding to enable fast video playback, but when we burn a DVD, VLC doesn't make efficient use of system resources, that’s why the burn speed is extremely slow. Especially when the file size are large or in high definition. Multitasking on your computer is another possible reason.
- Solution
Try a more powerful PC or Mac to rip DVDs in VLC.
Close unnecessary background programs to free up system resources.
- Personal experience
In our test, we add two 4K videos to burn to DVD with VLC, it ran overnight and after 8 hours it was still running this morning. At that time VLC is using about 15% CPU -- partially using one of 8 cores.
"VLC crashes in the burning process. This method is not workable."
- While there's no specific length or limit on video size and numbers, it is recommended not to overwhelm the program with multiple videos, as this may cause crashes.
- Downgrade VLC back to the previous version.
"The burned DVD has no audio."
- If your source video is not in MPEG 2 format, there will be no audio.
- If you do have videos in MPEG2, then please check the audio bitrates. With a wrong or not matching audio bitrate, VLC will generate a DVD without audio.
"I can't play the DVD I burned with VLC on my player."
- Some older DVD players may not be able to play DVDs created with VLC.
- An error may occurred while burning the disc and the process may not completed successfully.
- If the region code or the format of the disc and the player do not match, the disc will not play.
"The quality of the DVD burned with VLC is so poor."
- If the quality of the original video is low, the quality of the DVD will naturally be poor.
- DVDs originally only support a resolution of 720p. Even if you video is in a high resolution, the quality will be reduced to fit the DVD standard.
Part 4. A Faster and Better Way to Burn DVD
VLC is absolutely a good free dvd burning software. But as you can see above, the entire process was way complicated and there are so many issues to be resolved. What's worse, When you want a personalized DVD with a stylish menu, custom chapters and titles, VLC is unable to help you.
So, Can we burn DVDs on Mac or Windows more easily? If you’re looking for something more powerful and versatile than VLC, plenty of third-party DVD burners are available.
The tool I can totally recommend is iFunia DVD Creator - an app that can burn any video to a playable DVD on both Windows and Mac. Its standout feature is the ability to burn high quality DVD with menu, chapter, and subtitle. And the DVD burning process is very straightforward.
All popular video and audio formats are supported by the software, including MPEG 2, MPEG 4, AVI, MP4, FLV, MKV, MOV, WMV, etc. Home videos recorded on camcorders, mobile phones, tablet or other devices; videos downloaded from YouTube, Facebook, TikTok, etc.
Besides DVD disk, you can also choose to save as DVD Folder & ISO Files.
Apart from that, it provides other essential options: video editing, ready-made menu templates for different occasions, chapter setting, subtitle adding, audio track customizing and much more.
Just free download the trial version from the button below.
 Free Download Windows 10 or later
  Free Download macOS 10.12 or later
How to Burn DVD with iFunia DVD Creator
- Insert a writable DVD disc to your DVD drive.
- Download and install iFunia DVD Creator on your Windows/Mac.
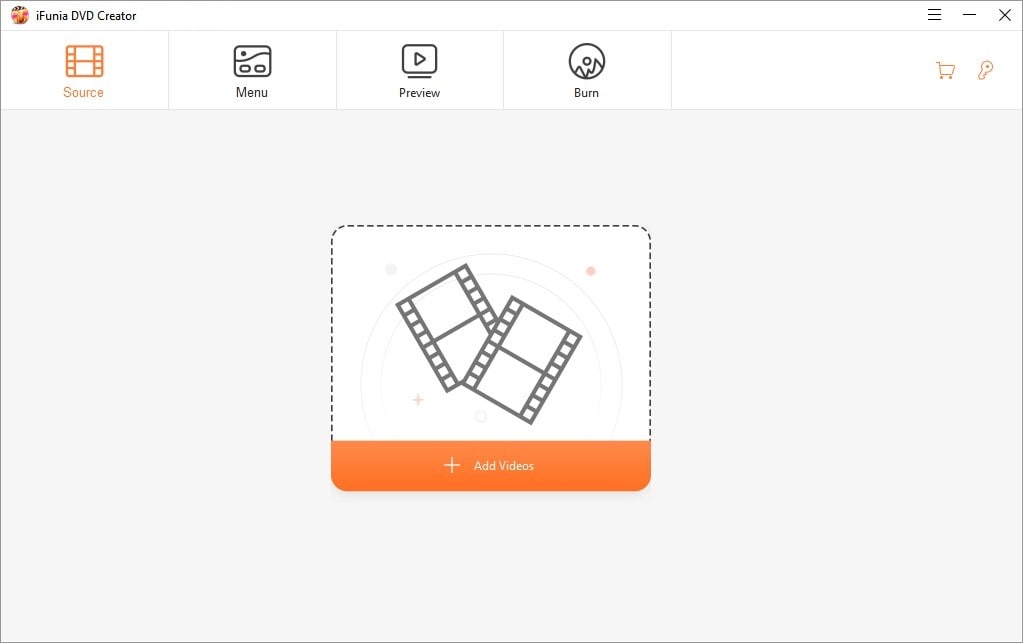
- Drag-n-drop your video files from a local folder to the program. iFunia DVD Creator supports multitasking, so if you plan to burn multiple files, import them all into the program.
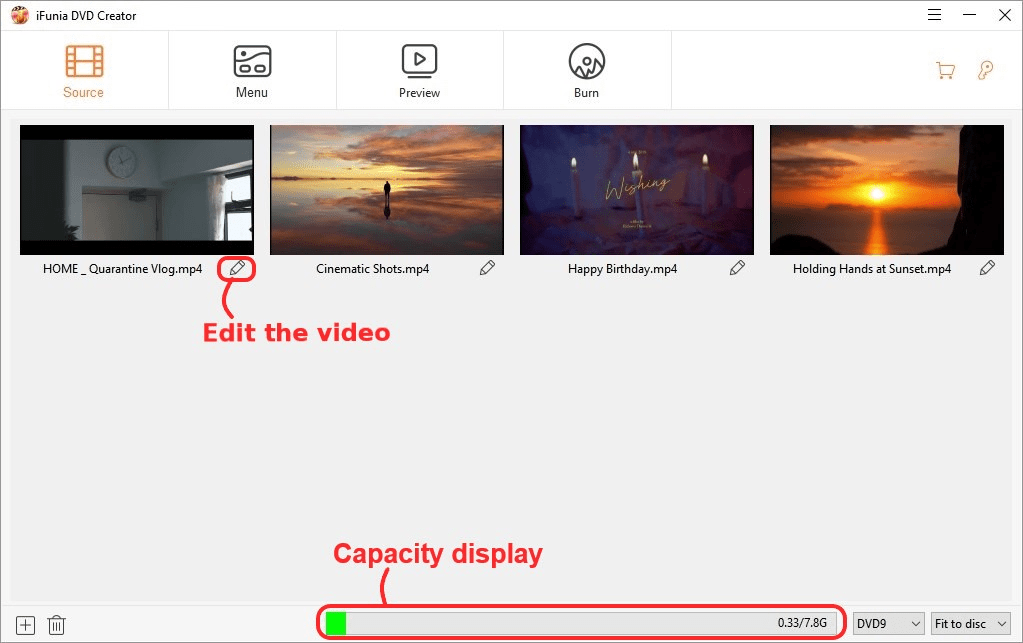
- Edit video before burning to DVD(optional), Just click the pencil like icon under the video thumbnail to edit your video with functions like cut, crop, add watermark, effects, rotate, subtitle (embedded or external), volume, etc.
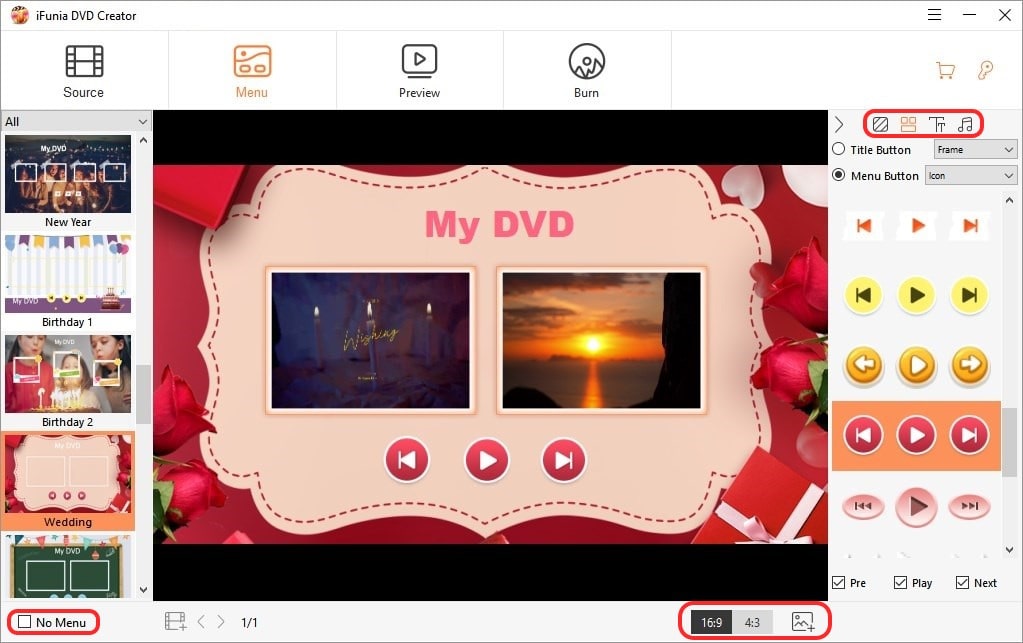
- Choose and design the DVD menu (optional), Switch to the DVD menu window, you can choose a DVD menu template. After choosing the theme, you can customize the menu background, frame, button, text as you like. If you don't need a menu for the disc, you just need to check No Menu.
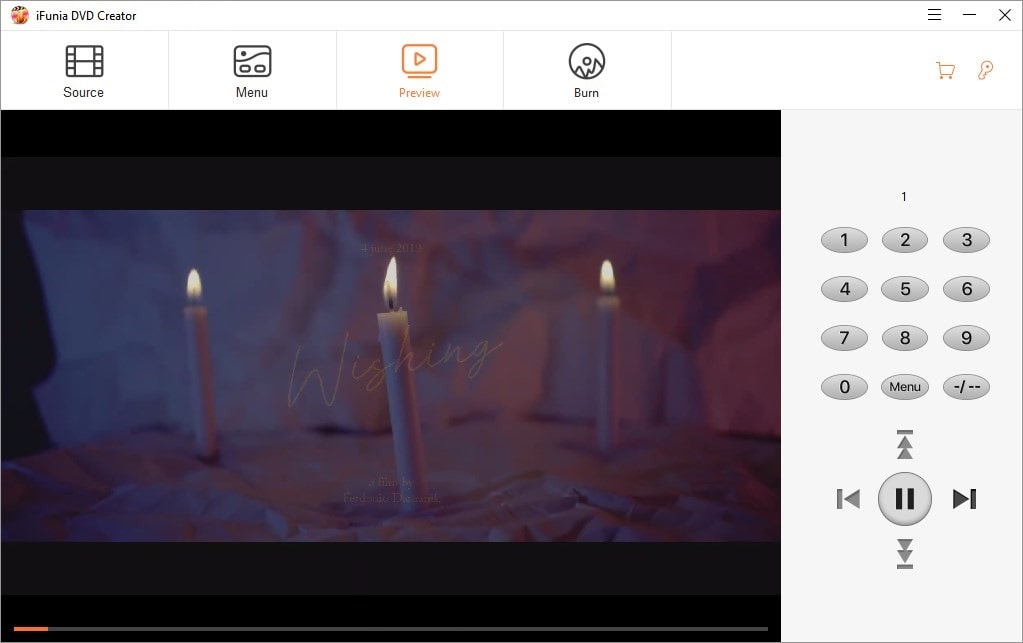
- Click Preview to check all the details before the final burning.
- In the "Burn Settings window" You can choose to:
Burn as DVD Disc, DVD Folder or ISO file.
Set the TV standard NTSC or PAL depends on the region where you live.
Set playback mode.
Set how many copies you’d like to burn.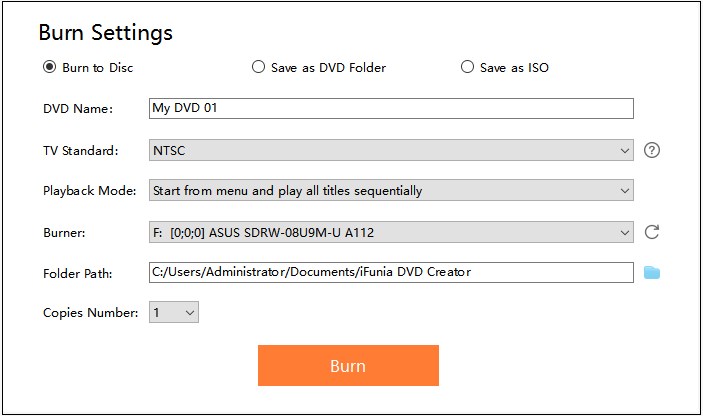
- After all the setting, Click Burn to start the burning process.
Conclusion
VLC is a media player instead of a DVD burner. It can be helpful in burning a plain DVD as it is free and supports multiple platforms. Still, it lacks many essential features a user may need to burn a playable DVD.
The VLC DVD burning process is complicated and took a long time. While, the resulting DVD quality may not be as good as other dedicated DVD burning software.
In comparison with the latter solution, iFunia DVD Creator, VLC is not so handy and versatile. With iFunia DVD Creator, you can burn videos in high quality, add chapters and choose a customizable menu. Even beginners can create professional-quality DVDs. So, if you need a more direct, error-free and batch way to burn videos to DVD, iFunia is the solution to go.
 Free Download Windows 10 or later
  Free Download macOS 10.13 or later

Chloe LEE is good at explaining and solving complex technology problems to her readers. Since joining iFunia Studio, she has focused on writing articles about video and DVD software, and how-to tutorials.


