


5 Easy Ways to Burn DVDs on Windows 10


How to burn a DVD to preserve our precious video files on an optical disk? I have found 5 easy and reliable ways to burn a DVD from your videos and other digital files on Windows 10 using burning software or the built-in burning tools. You can choose the most suitable method based on your requirements and burn a DVD easily by following this step-by-step guide.
 iFunia DVD Creator
The Fastest Way to Burn a Playable DVD with Ease
- Burn video(s) to standard DVD discs with a lossless quality
- Output ISO image & DVD folders for later burning
- Support video file in MP4, MKV, WMV, AVI and 200 more formats
- Personalize DVD menu templates with background image & music, buttons, text and more
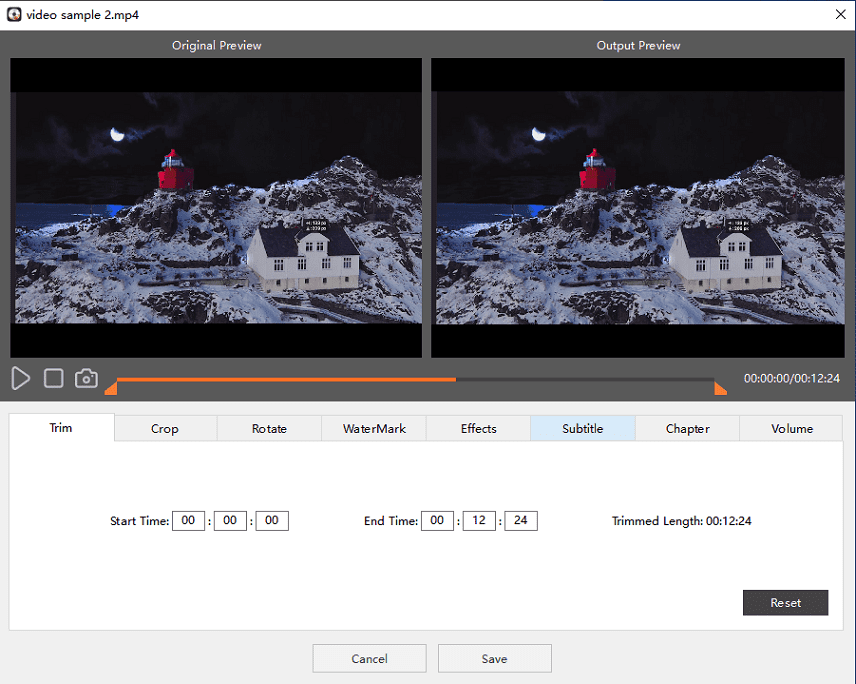
- Edit the video with Crop, Trim, Watermark, Subtitle, Effect, Chapter functions
- Real-time preview of the DVD before burning
- Fast and smooth burning
- Easy to user with a modern user interface
 Free Download Windows 10 or later
  Free Download macOS 10.12 or later
Tips for Successfully Burning a DVD on Windows 10
Before you get started to burn a DVD on PC, here are some basics and tips for you to burn a successful DVD, especially for a video DVD to play on DVD players.
- Prepare quality DVD media. To avoid some potential problems during DVD burning and playback, you may choose a high-quality DVD disc from reputable manufacturers such as Sony and Maxell. As for the preferable DVD type, I recommend DVD-R for its great compatibility with most DVD players.
- Ensure the DVD disc is not overfilled. You can manage your video files needed to be burned, and make sure the size of the files doesn’t exceed the DVD capacity. A standard DVD often hold up to 4.7 GB (DVD-5), while a dual-layer DVD can hold up to 8.5 GB (DVD-9). The actual disc capacity may vary from burners and software.
- Choose the right DVD format. If you want to create a DVD to be played by DVD players, you should burn a video DVD using DVD burner software. A data DVD just stores the data put on it, and can only be played on computers and a few compatible DVD players.
- Use a reliable DVD burning software. In this tutorial, I selected some reliable and easy-to-use DVD burners that you can use burn DVDs like a pro with menu and titles.
- Burn at a slower speed. Burning a DVD at a slower speed can help reduce the risk of errors during burning and playback, especially when playing on old DVD players.
The Fastest Way: Burn a DVD Using iFunia DVD Creator
If you want to burn a personalized DVD-video, my recommendation is to use a simple dedicated burning software to make the process easy and fast. My top choice is iFunia DVD Creator, a professional and user-friendly DVD burner that allows users to burn a DVD on Windows 10 effortlessly within 3 steps.
What you can do with the best DVD burning software:
- Burn video(s) in different formats to DVD±R, DVD±RW, DVD±R DL, etc.
- Edit the video file(s) with functions of Trim, Crop, Subtitle, Soundtrack, Chapters, Watermark, etc.
- Design a DVD menu with templates and customize the layout, frame, image, buttons as you like
- Preview the the DVD before burning to a disk
- Save the unfinished project and continue next time
- Burn directly to disc or save as ISO or DVD folder for later burning
Free Download Windows 10 or later
How to Burn a DVD easily on Windows 10:
Step 1. Launch iFunia DVD Creator on Windows 10
You will see an explicit interface with 4 tabs.
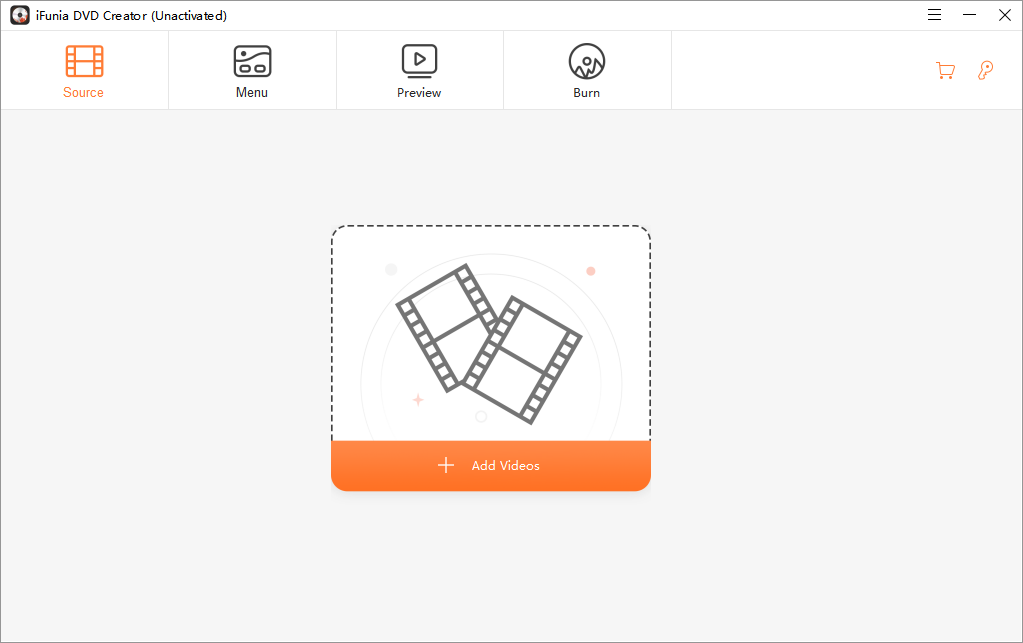
Step 2. Add video source
Under the 'Source' tab, simply drag and drop your video(s) onto the main interface. Or, you can click the menu icon > select 'Add Files' to import video(s) to the window.
You can see the DVD capacity used from the green bar at the bottom of the main window. Choose 'high quality' to preserve a lossless quality, or 'standard' to include a larger file size than your disc.
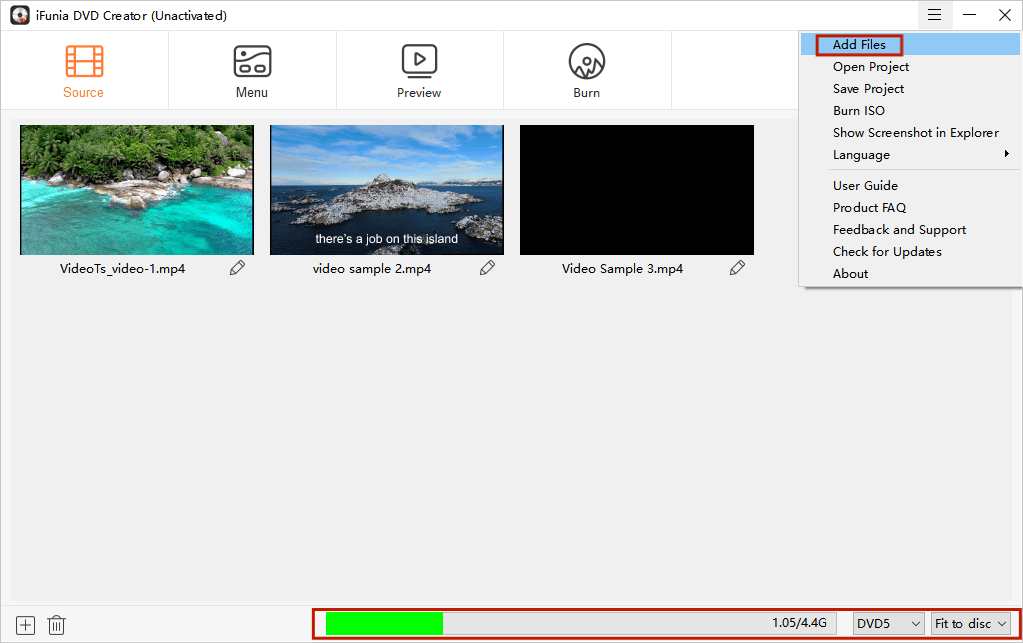
Pro tip: Click the pencil icon under the video thumbnail to edit the video.
Step 3. Create a DVD menu (optional)
Switch to the 'Menu' tab to choose a menu from various templates, or skip it by ticking 'No Menu'.
You can custom a personalized DVD menu by changing the background picture, music, buttons, text, aspect ratio, etc.

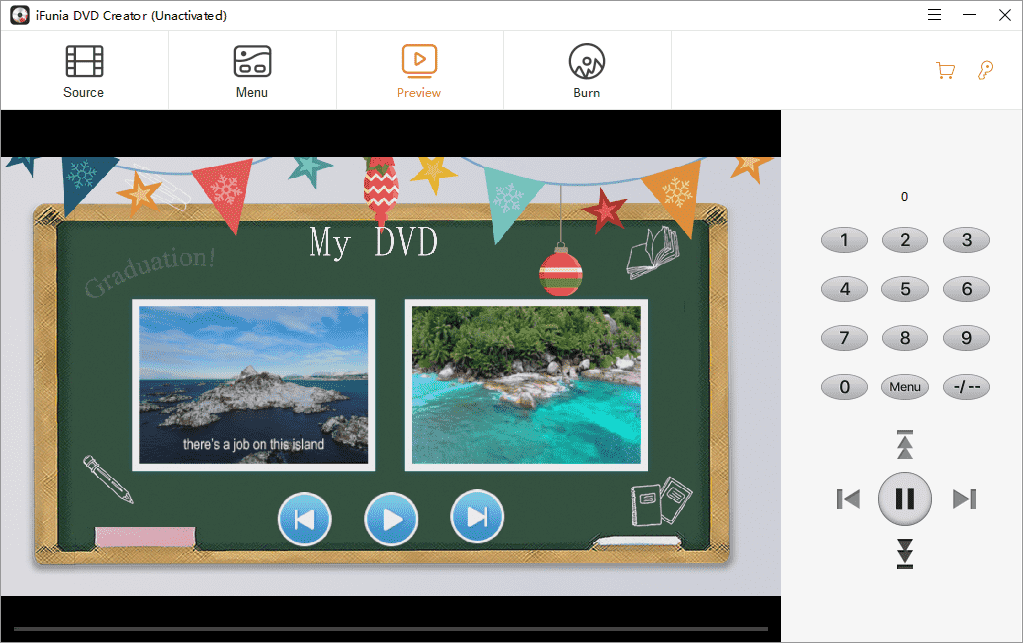
Step 4. Preview
Switch to the 'Preview' tab to preview your DVD before burning. Click the numbers or arrows to view the titles. You can go back to 'Menu' tab anytime to make changes.
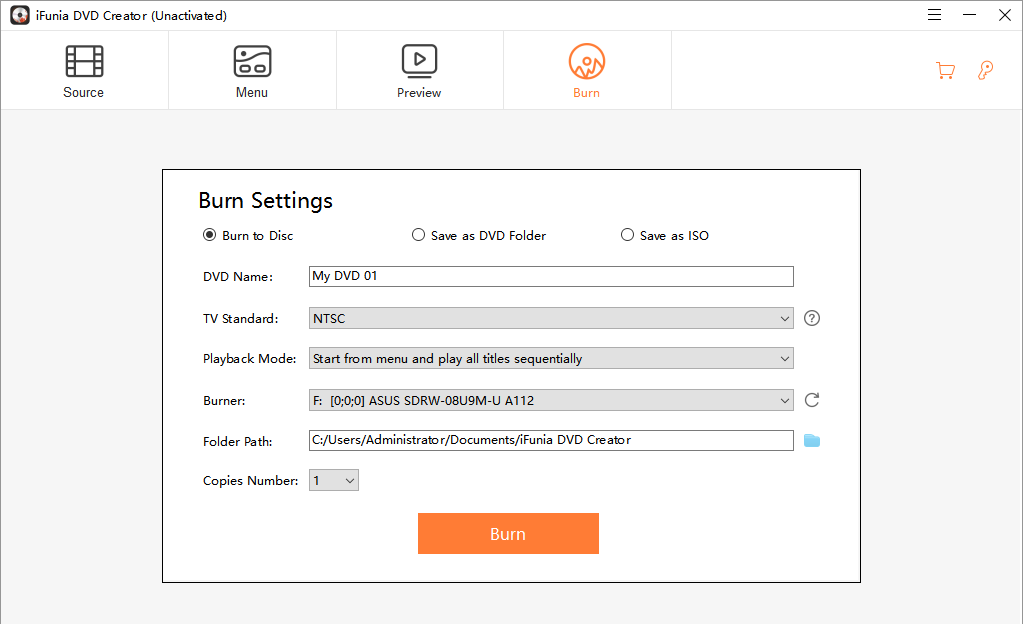
Step 5. Burn to DVD
Switch to the 'Burn' tab to adjust the burning settings. You should first insert a blank DVD disc into your PC's drive and choose the blank DVD as the 'Burner'. For TV Standard, select NTSC (for North American) or PAL (for Europe). Finally, hit the 'Burn' button to start burning a DVD on Windows 10. You can also save the DVD project as ISO image or DVD Folder.
Burn a DVD Using Open-source Burners on Windows 10
If you want to burn a DVD on Windows 10 using freeware, be careful to avoid some potentially unwanted programs (PUPs), such as bundled software, adware and scam software. I recommend only open-source freeware from the official websites. This section includes 2 reliable freeware for beginners and advanced users to burn DVDs on Windows 10.
1. How to burn a DVD using DVD Flick
DVD Flick is a simple DVD authoring tool for Windows relied on FFMPEG. It allows you to add multiple video files and burn them to a DVD to play on your DVD player and media center. The interface may be outdated, but it's quite easy to use.
Step 1. Download DVD Flick from https://www.dvdflick.net/download.php
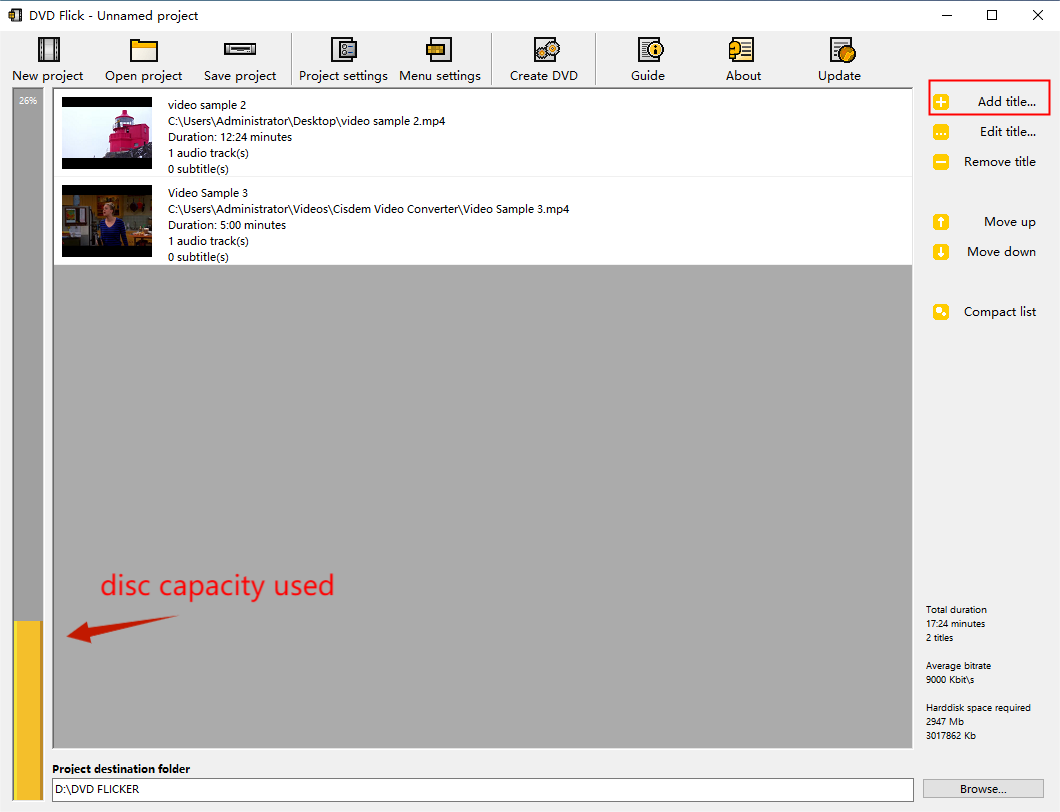
Step 2. Add video titles. Click the 'Add title' button to add video file(s) to the interface.
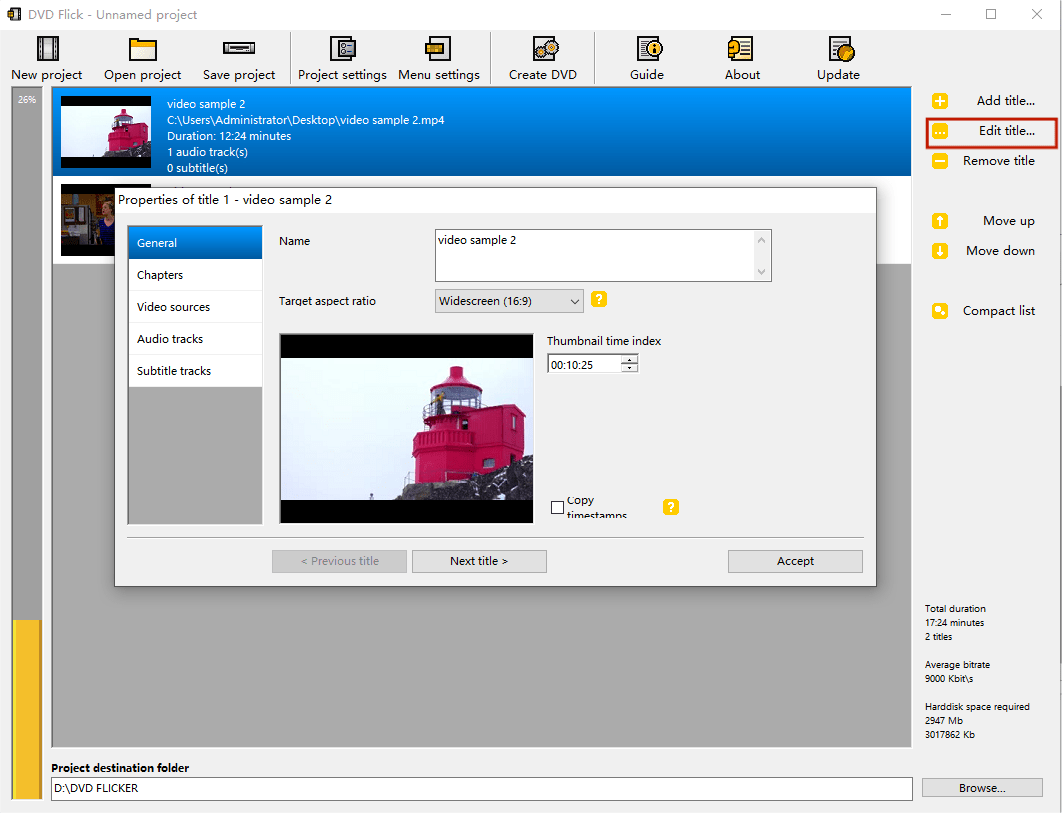
Step 3. Edit the titles. You can edit each title by double-clicking it or clicking on it once and pressing the 'Edit title' button. Here you can add audio, chapters, subtitles, change aspect ratio and thumbnail in the menu. But it won't let you trim or crop the video.
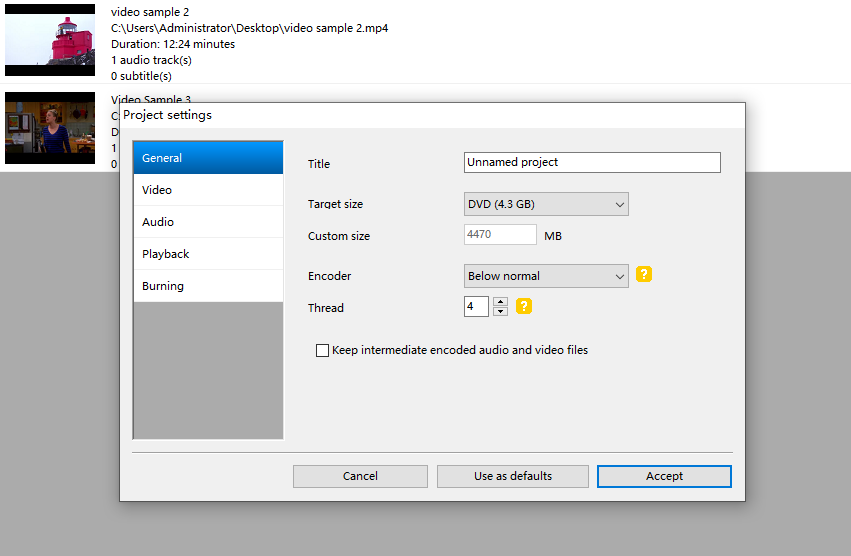
Step 4. Click the 'Project settings' button on the top to configure the video settings. The first thing you need to set here is the 'Target size', you can change the default setting DVD-5 (4.3 GB) if you use a DVD-9 (7.9 GB). Under the 'Burning' tab, check 'Burn project to disc' to burn the encoded project straight to your empty disc, or create ISO image. Choose a 4x-6x speed to reduce the chance of errors.
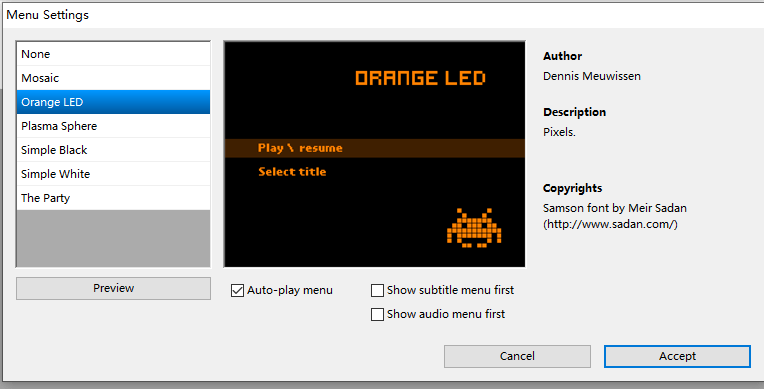
Step 5. Create a menu. If you want to add a menu to DVD with multiple titles, click the 'Menu settings' button. Here you can choose from the 6 templates and preview. But you can't play titles while previewing, as I tested.
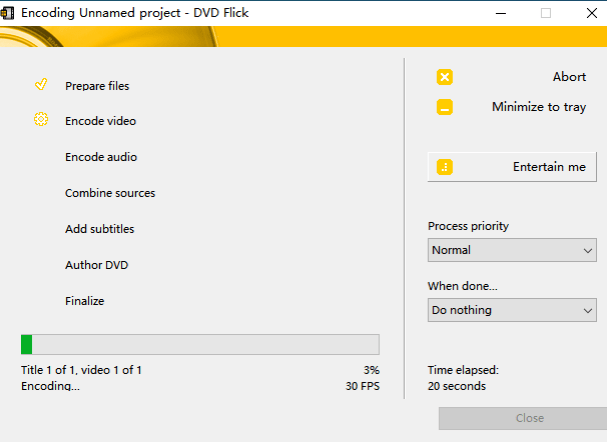
Step 6. Start burning. Once you are finished setting your project, press the 'Create DVD' button and start encoding and burning a DVD on Windows 10.
2. How to burn a DVD using DVD Styler
DVD Styler is a free and open source DVD authoring software for Windows and Mac. Similar to DVD Flick, it allows burning of video files on DVD and creation of DVD menus for navigation. Equipped with more custom features, DVD Styler may not be for beginners but more experienced enthusiasts. But it can’t let you preview the DVD before burning and the process can take longer time than professional burning software.
Step 1. Download and install DVD Styler from https://www.dvdstyler.org.
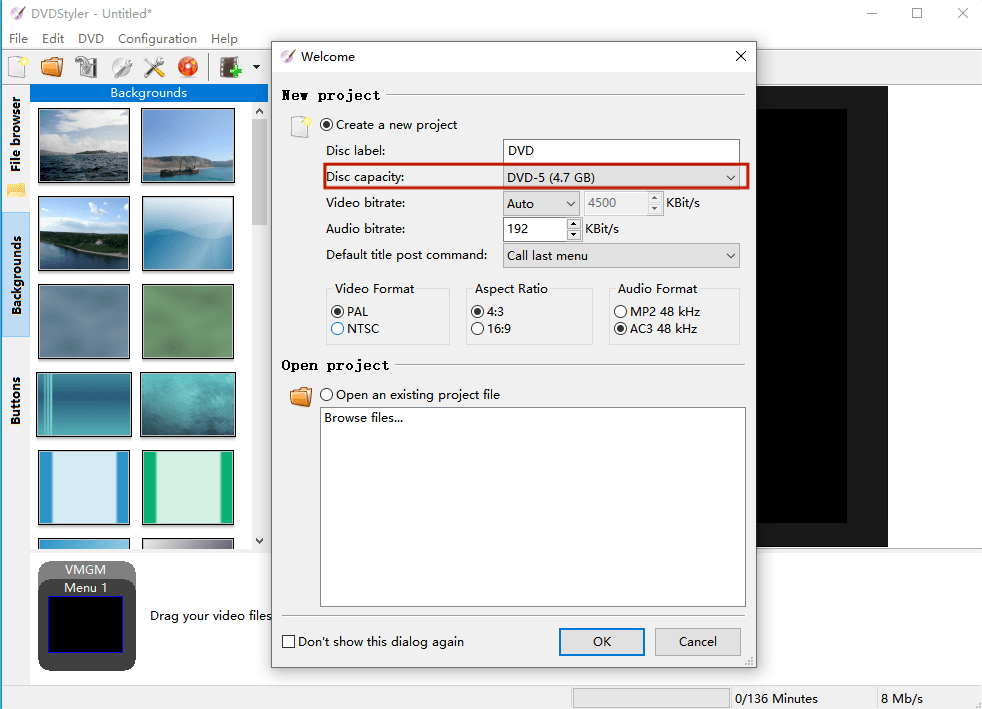
Step 2. Create a new project. Open the software and a new project window will pop up automatically to let you configure the project settings first. Click 'OK' to select a template and enter a title for your DVD menu.
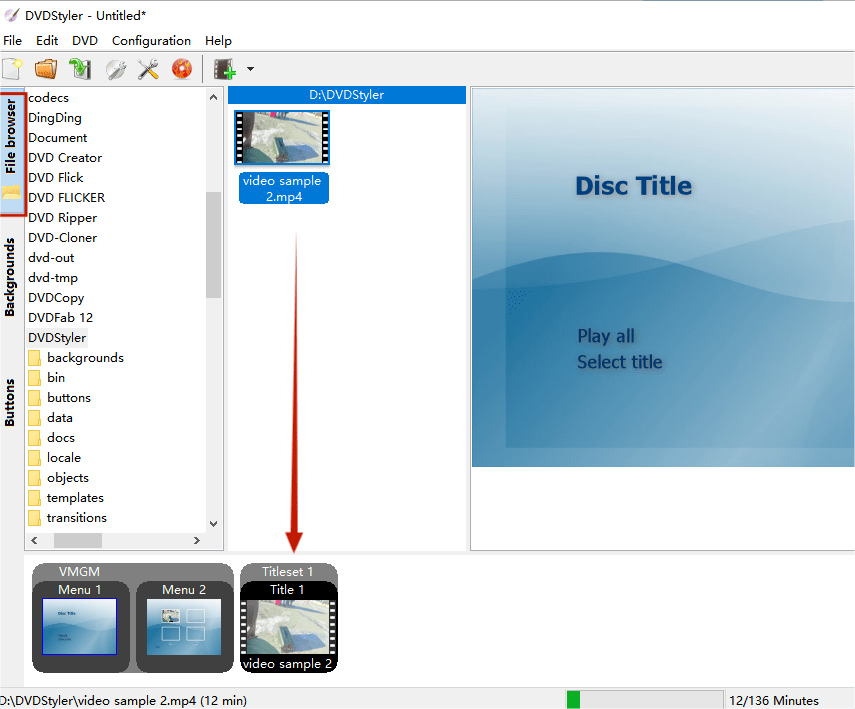
Step 3. add video file(s). click the 'File Browser' tab on the left of window to find the desired video, then drag it onto the Titleset Manager at the bottom of the window.
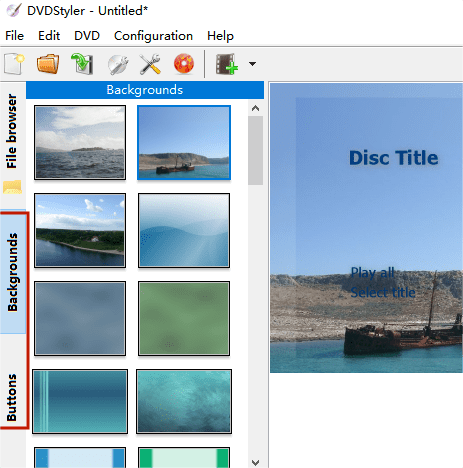
Step 4. Design a DVD menu. Press the 'Backgrounds' tab on the left to select an image by double-clicking on it. You can change the position of the text and change its font and size. Switch to the 'Buttons' tab to insert buttons and frames by dragging into the Menu Editor on the right.
Note: You can't preview the menu and DVD before burning.
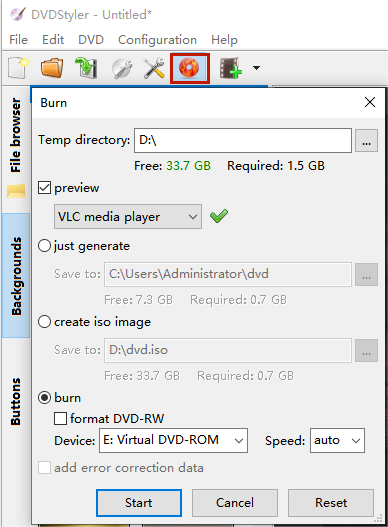
Step 5. Start burning a DVD on Windows 10. Click on the Burn button on the top to bring up the 'Burn' dialog, choose to burn to the disc, or just create an ISO image. You can check 'preview' to see the DVD content after burning of the DVD.
Burn a DVD Using Windows 10 Built-in Burning Tools
If you just want to burn a data DVD without any third-party software, you can use the built-in burning feature of Windows 10. Data DVDs can store a variety of files including videos, music, photos, but they can only be played on computers and few DVD players that support the file format.
1. How to burn a DVD using Windows Media Player on Windows 10
Step 1. Place a blank DVD disc into the drive of your computer.
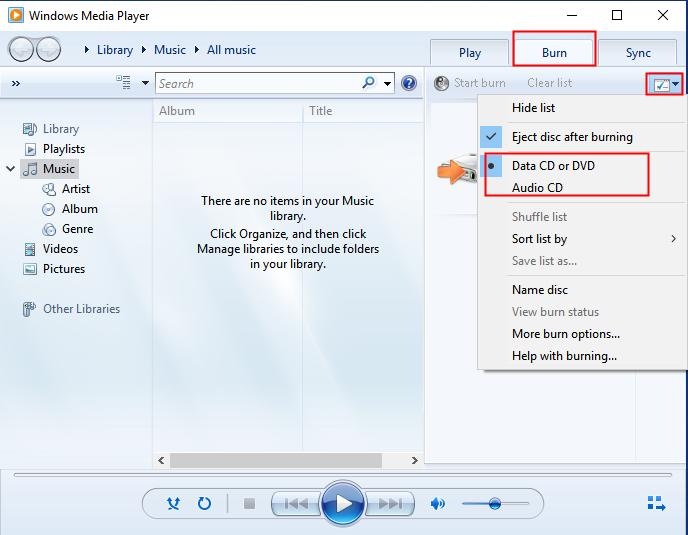
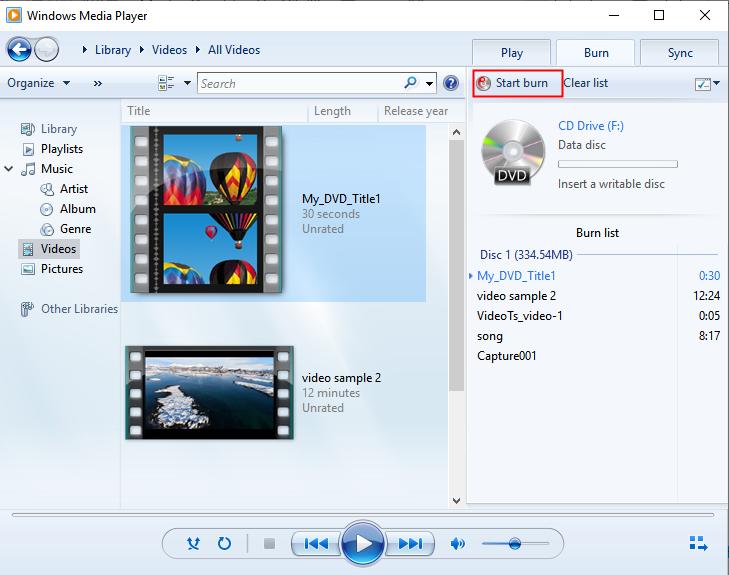
Step 2. Open the Windows Media Player window and click the 'Burn' tab. Under the Burn tab, click the Burn options button to select 'Data CD or DVD'.
Step 3. Create a burn list. Drag the files that you want to burn to the 'Burn list' on the right side. You can arrange the order of the files by dragging them up or down in the list.
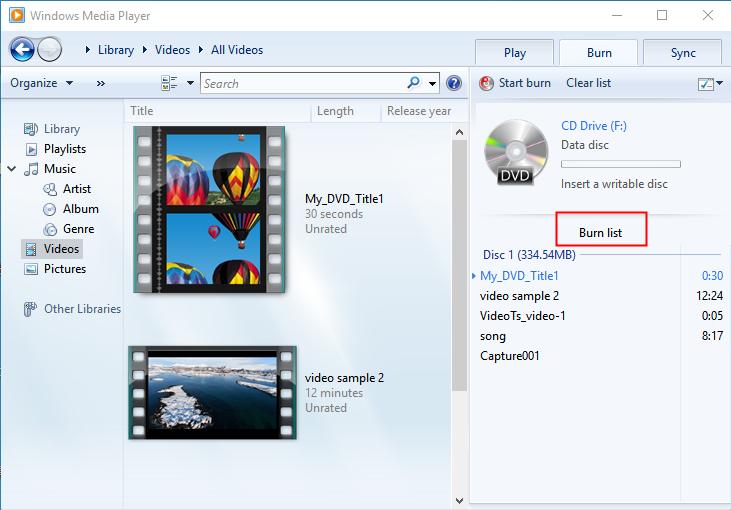
Step 4. Start to burn. When you're ready, click the 'Start Burn' button to begin the burning process on Windows 10.
2. How to burn a DVD using File Explorer on Windows 10
Step 1. Insert a blank DVD into your DVD drive.
Step 2. Open File Explorer ![]() and locate the files you want to burn to the DVD. It's recommended to arrange your desired files in a folder in advance.
and locate the files you want to burn to the DVD. It's recommended to arrange your desired files in a folder in advance.

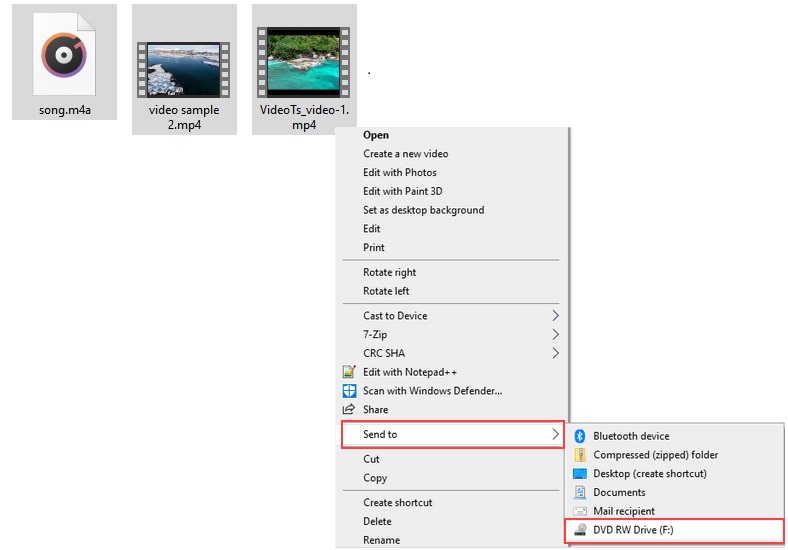
Step 3. Select all the files, and right-click on them. Select 'Send to' > DVD Drive. A 'Burn a Disc' dialog will appear.
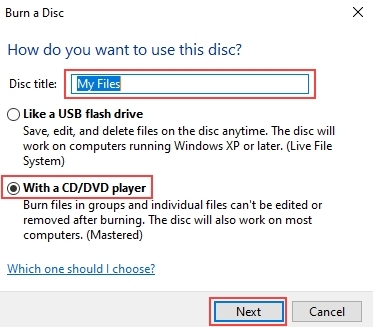
Step 4. In the 'Burn a Disc' window, enter a Disc title, and choose how you wish Windows writes the Disc. Select 'Like a USB flash drive' option if you want to write and erase files anytime without finalizing the disc. Just copy and paste all the files to the disc and you can eject the DVD. Move to the next step if you select 'With a CD/DVD player' to burn a data DVD.
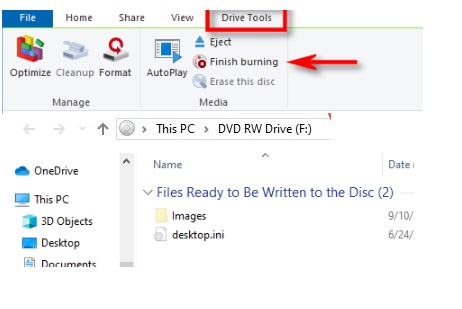
Step 5. File Explorer will then open the DVD disc drive in a new window, where you can see all the files under a heading 'Files Ready to Be Written to the Disc'. Then click 'Drive Tools' on the toolbar of the window and select 'Finish Burning'. Then a 'Burn to Disc' windows will appear.
Step 6. In the 'Burn to Disc' dialog, you can change the DVD title and select a burning speed. Click 'Next' to start burning on Windows 10.
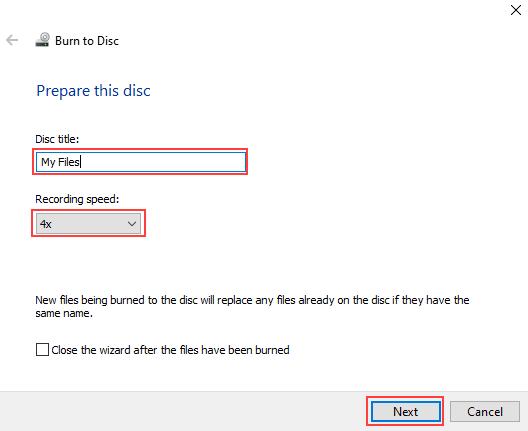
Note: The progress bar of the burn will show on screen. Do not eject the disc until the entire process completes.
FAQs about DVD Burning on Windows 10
1. What type of disc should I use to burn a DVD?
To burn a DVD, you need a recordable DVD (DVD±R) or a rewritable DVD (DVD±RW). I recommend DVD-R for better compatibility with both old and new DVD players. A DVD±RW can be written and erased multiple times but not suitable for long-term backup and storage. DVD-RAM is a more robust rewritable type but has very limited compatibility with most DVD players.
2. What's the difference between a video DVD and a data DVD?
Video DVD is a playable DVD disc like the commercial DVD movie. It can be played on standalone DVD players as well as computers. To burn a DVD-Video disc on Windows, you need to use a dedicated DVD burner software.
Data DVD can store various types of data such as MP4, M4A, JPEG and other documents. It can only be played on computers and modern DVD players that support the specific format.
3. Can I burn a DVD from high quality 1080p videos?
Yes, as long as it fits the storage capacity of the disc. If the video is too long with a high definition, you may need to devide it into two or even more discs or reduce the video quality. You can choose a lossless quality or a compressed quality that fits the disc when you burn a DVD using a dedicated burning software.
Button Lines
To create a DVD for playback on DVD players and computers, you need to use a good DVD burning software like iFunia DVD Creator with a smooth burning process. The open source solutions in this guide are also safe and worth trying for burning a simple DVD-Video. And you don't need to download any software to create a data DVD on Windows 10 to back up files. I hope this article can help you successfully burn a DVD on Windows 10, and enjoy your videos on any DVD player.

Chloe LEE is good at explaining and solving complex technology problems to her readers. Since joining iFunia Studio, she has focused on writing articles about video and DVD software, and how-to tutorials.
Comments (0)
Leave a Reply